Application performance is critical, especially in customer-facing applications where clients expect real-time responses and any delays can contribute to poor user experiences and lost business. To meet these demands, .NET developers rely on scalable and reliable caching solutions that help enhance the performance of their applications. NCache, a powerful in-memory distributed cache solution, tackles these challenges by handling database bottlenecks and high transactional loads seamlessly, making it essential for mission-critical applications.
Implementing a new distributed caching tier might seem daunting at first, but it’s simpler than you think. This blog helps you set up, configure, and integrate NCache with your .NET applications in five straightforward steps.
Step 1: Software Setup
The first step in working with NCache is setting up the environment to ensure your caching infrastructure is properly configured and optimized. This involves selecting the appropriate deployment option and setting up the server where data will be cached. NCache provides multiple deployment options across various environments (on-premises setups, cloud platforms, or containerized solutions). To ensure it meets your requirements, it is recommended to start by downloading NCache and testing it in your preferred setup as part of a 30-day evaluation. Let’s explore these deployment options in detail to help you decide what’s best for your application.
On-Premises Deployment
If you’re looking to deploy NCache in a private data center or an on-premises environment, you can install NCache directly on your servers. This method gives you full control over your caching infrastructure, making it ideal for organizations with strict data governance policies. To get started, follow the steps below:
- Download NCache Software:
Visit the NCache download page and choose the version that fits your environment:- For users of .NET 8 and onwards, download the .msi installer for Windows or .gz for Linux. This installer is also compatible with .NET 5 and .NET 6 users.
- For legacy applications using .NET Framework 4.8, download the .msi installer for Windows that corresponds to this version.
The installation process is simple, but you can refer to the NCache Installation Guide for further guidance.
- Set Up NCache Clients:
In addition to installing the server software, you’ll need to configure clients to connect to the distributed cache. You can easily integrate NCache with your .NET application by setting up the .NET development environment. For detailed instructions on how to set up the environment and install the necessary NuGet packages, you can refer to the NCache Programmers Guide. If you want to skip the NCache installation process, you can configure the client using the client.ncconf.Once you’ve set up NCache, the next step is to configure your cache connection. To do this, follow the guidelines provided in the Cache Connectivity Section to connect your application to NCache. Next, you’re ready to begin developing your application using NCache’s powerful caching APIs. For detailed guidance, refer to the NCache Programmers Guide.
Cloud Deployment
For cloud applications, NCache provides two distinct cloud deployment models to cater to different needs:
- SaaS (Software as a Service):
NCache offers a fully managed service on popular cloud platforms such as Azure and AWS. This model removes much of the operational overhead generally involved in managing cache servers.- Azure or AWS Marketplace: You can directly purchase and deploy NCache as a service from these marketplaces. The NCache Enterprise Cloud is readily available on both platforms, making it easy to get started.
- Payments and Management: When you choose the SaaS model, Azure or AWS manage payments and server maintenance, letting you focus entirely on application development.
- BYOL (Bring Your Own License):
For more control, NCache also supports a BYOL model. This approach allows you to deploy NCache on cloud platforms like Azure, AWS, or Google Cloud while bringing your own license. With BYOL, you can manage licensing costs, customize your setup, and fully manage your cloud caching infrastructure.
Containerized Deployment (Docker/Kubernetes)
NCache is also optimized for containerized environments, offering a flexible and lightweight deployment model that fits perfectly within the microservice architecture. If you are working with Docker or Kubernetes, you can seamlessly integrate NCache into your existing containerized workflows. If you navigate to the Kubernetes/Docker tab of the NCache download center, you’ll find resources to set up containerized deployments. For example, on Docker, you can easily pull the .NET edition of NCache Enterprise for Windows or Linux by running the following command below:
For Kubernetes, NCache supports Azure AKS, AWS EKS, and Red Hat OpenShift deployment, providing users with the flexibility to deploy NCache wherever their Kubernetes clusters are hosted.
System Requirements
Before you proceed with the installation, ensure that your infrastructure meets the minimum hardware and software requirements for NCache to function optimally. The NCache server and client requirements are mentioned below:
NCache Server Requirements:
NCache offers different server profiles to suit different deployment scenarios. Their server requirements depend on the environment where NCache is deployed—whether in production or staging. For production environments, with higher transaction loads, you may opt for larger profiles such as SO-32, SO-64, or SO-128. In non-production environments, such as testing or QA, smaller profiles like SO-4 (4 GB RAM, 2 vCPUs) or SO-8 (8 GB RAM, 4 vCPUs) will suffice.
Operating Systems Supported:
- Windows: NCache supports Windows Server, and 2019.
- Linux: NCache can be deployed on Ubuntu, Debian, and Red Hat Enterprise Linux (RHEL).
Please note that regardless of the platform (Windows or Linux), .NET 6 or later must be installed on the server, as NCache uses .NET for server-side code, including operations such as Read-through, Write-through, and other server-side caching mechanisms.
NCache Client Requirements:
NCache clients, which are typically application or web servers, have similar hardware requirements to the NCache server. The client-side platform and hardware should align with the server-side infrastructure to ensure optimal performance.
Recommended Hardware:
- CPU: 8–40 cores
- RAM: 16–128 GB
- Network Card: 1–10 Gbit
Clients can be deployed on both Windows and Linux environments. The specific platform choice depends on your application stack.
Supported Platforms for Clients:
Windows:
- Windows Server 2019
- .NET 6 or .NET 4.0+ depending on your application requirements.
Linux:
- Ubuntu, Debian, or Red Hat Enterprise Linux
- .NET 6 or later for .NET applications
Step 2: Create NCache Distributed Cache Cluster
The next step is to create an NCache cluster, which allows you to distribute your cache across multiple servers for enhanced scalability and fault tolerance. NCache gives you the option to easily configure your cluster through its powerful NCache Management Centre. You can define your distributed cache topology, configure your cache size, eviction policies, and even enable compression for larger objects. Once you’ve added your nodes and set the necessary parameters, your cluster will be up and running. For a more detailed guide on this process, you can refer to this blog.
Step 3: Configure NCache Clients
The next step is to configure NCache clients. A client node is an application server that connects to the clustered cache to make API calls. You can easily add client nodes using the NCache Management Center, which allows you to manage and monitor the cache seamlessly. Clients can be added dynamically while the distributed cache is running, providing flexibility in scaling. For detailed instructions on how to add or remove client nodes, refer to the NCache Administrators Guide.
Step 4: Test the NCache Distributed Cache Cluster
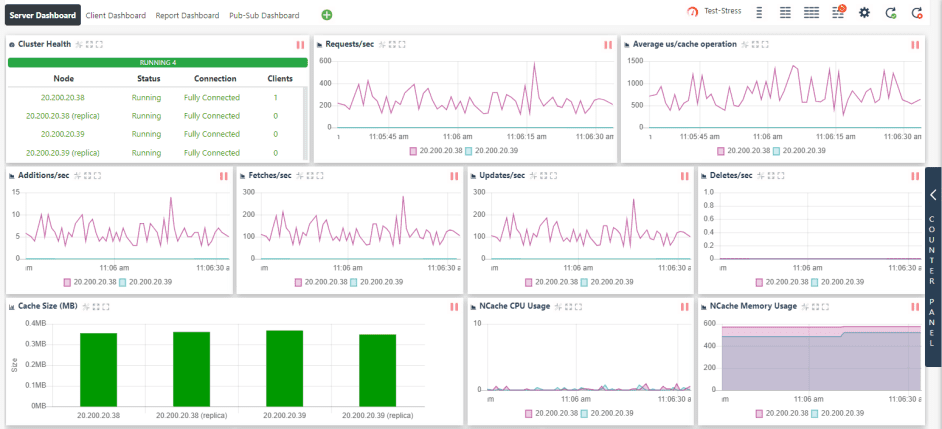
The next step is to test the NCache Cluster. NCache provides monitoring tools to track cache performance through graphical dashboards, showing metrics like memory usage, request rates, and cluster connectivity. You can customize these dashboards and enable logging for distributed caches and clients to gain detailed insights. To monitor your cluster, click on the “Monitor” button in the NCache Management Center. For more details, refer to the NCache Administrators Guide. The following is a monitoring dashboard illustrating the possible performance insights you can get from the NCache Monitor.

Figure 1: Monitor cache.
Step 5: Use NCache in Your Application
The final step is to use NCache in your application. NCache can be used for various purposes including session state management (for ASP.NET and ASP.NET Core), object caching, and serving as a backplane for SignalR (for ASP.NET and ASP.NET Core). Let’s discuss the two common use cases: as a distributed cache and for messaging and streams.
NCache as a Distributed Cache:
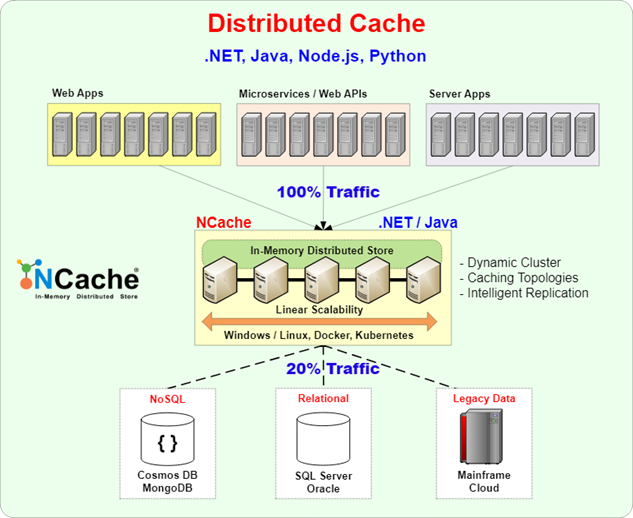
NCache helps optimize application performance by caching data between the application tier and the database, reducing database calls, and improving scalability. It ensures that applications access the cached data 80% of the time, enhancing overall system performance. For more details on how this architecture works, refer to the video on Distributed Cache Architecture. The following diagram illustrates how NCache works as a distributed cache.

Figure 2: Distributed Cache.
NCache for Messaging and Streams:
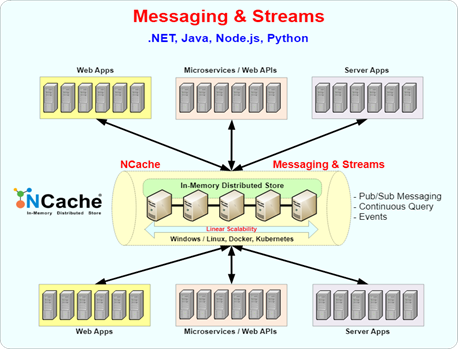
NCache serves as a scalable messaging and stream platform, supporting decoupled communication between microservices, web apps, and APIs. For further insights into this model, refer to Pub/Sub Messaging. For a cursory understanding of the model, the following diagram demonstrates how the Pub/Sub messaging architecture works.

Figure 3: NCache as a Distributed Cache for Messaging and Streams Platform.
Conclusion
In conclusion, NCache simplifies caching for .NET applications, enhancing performance and scalability effortlessly. For further assistance, explore implementation samples on NCache’s GitHub Repository and experiment with NCache features online without installation on the NCache Playground. Try NCache today to elevate your application potential!


