NCache is a high-performance, in-memory distributed cache designed for .NET, Java, Python, and Node.js applications. Renowned for its speed and scalability, NCache is widely used in production environments for mission-critical, user-interactive applications where high availability is essential. Its robust feature set ensures that these demanding requirements are met. These make NCache a reliable choice for maintaining optimal application performance.
One of these features is Live Upgrade (only available in NCache Enterprise), which enables you to update NCache to a newer version through a Bridge – without causing any interruptions to your application. Essentially, NCache provides a Bridge topology for WAN replication that serves as a bridge between two cache clusters to maintain the most recent version of your cluster. This blog details how and why you should upgrade to NCache’s latest version.
Why Upgrade to NCache newer versions
If you’re using an older version of NCache, we strongly encourage you to upgrade to the latest version to reap the benefits of all the latest features and enhancements. Moreover, to see all the details of these features and improvements brought forward by NCache 5.3 SP4 (or any other version), you can read the release notes of NCache 5.3 SP4.
Live Upgrade with Negligible Data Loss
The time it takes to upgrade software manually reduces greatly via such updates. Thus, you can use the Live Upgrade feature to clone data from your presently operating cache (known as the source cache) to the new cache (target cache) while the caches are still running. With asynchronous data replication, clients connected to the source cache experience uninterrupted activity, even while data is being copied to the target cache. The source cache, meanwhile, continues to operate flawlessly and is unaffected by the change.
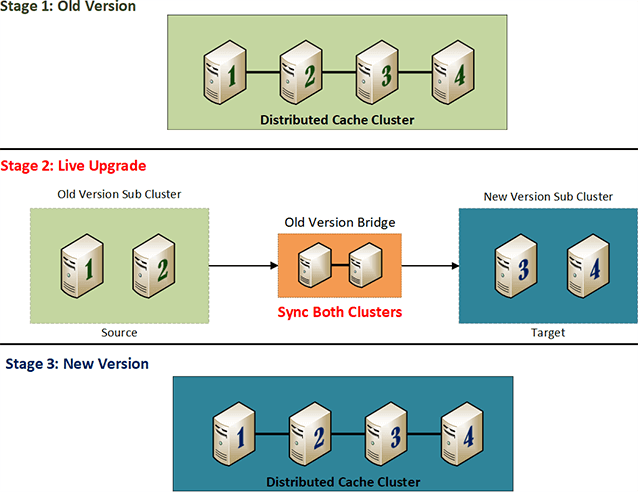
Figure: Upgrading to NCache Newer Version
The figure shown above displays the breakdown of a 4-node cluster as it transitions from an older version of NCache to a newer version. First, you stop nodes 3 and 4 and install the latest NCache version on these nodes. Next, create a 2-node cache on the newly NCache version installed machine (nodes 3 and 4). At this point, we have a total of two caches consisting of 2 nodes each. Let’s call them the source cache (cache with old NCache version installed) and target cache (cache with new NCache version installed). Then, you need to create a bridge between these two caches to transfer data from the source to the target cache. Stop the source cache’s nodes and install the latest NCache version on it. Next, add nodes 1 and 2 to the target cache to make it a 4-node cluster.
For optimal performance, we recommend a 4-node cluster, allowing you to split data between two server nodes without risking data loss. Divide the cluster in a way that ensures equal data distribution across its nodes. If you have a 2-node cluster, splitting is not advisable. Instead, set up a temporary 2-node cluster with the newer version of NCache installed. Once the existing nodes join this new cluster, you can safely remove the temporary nodes.
How to Upgrade to NCache Live Version
For instance, we have a 4-node cluster as explained in the diagram in the previous section. Take out two nodes (3 and 4) and install the latest version of NCache on them (target cache). The other two nodes (1 and 2) have an old version of NCache installed (source cache). Both caches are identical in terms of name and configuration. This is an active-passive configuration.
- Create a new bridge between these two clusters as explained on the Create Bridge page.
- In the <bridge-config>…<cache> tags of bridge.ncconf on the bridge node, manually add the target cache as follows:
- Following the bridge.ncconf modification, restart the bridge service using the following PowerShell cmdlet.
- Provide the source cache and target cache as inputs to the Start-BridgeStateTransfer PowerShell command to begin state transfer.
- The data will asynchronously replicate from the old cluster (active) to the new cluster (passive).
- Once, when the two caches are fully synchronized, you need to stop the clients and reconnect them with the newer cluster. To do so, change the IP address of the source cache server(s) to the IP address of the target cache server in the client.ncconf of each client node(s) and reconnect the clients.
- Remove the bridge.
- After the clients have been successfully connected to the newer cluster, stop the older cluster and install the newer version on it. Add these servers to the cache cluster with the newer version after upgrading the NCache software on all of its servers.
- Join the nodes 1 and 2 to the newer cluster one after the other.
Conclusion
NCache enables seamless upgrades to its latest versions, ensuring minimal data loss and reducing the hassle of transitioning between versions. Whether performing a live upgrade or an offline update, NCache simplifies the process for its users. For more information, please refer to the NCache documentation.