Most multi-tier applications involve multi-level communications, such as browsers interacting with different web APIs, which in turn communicate with other web APIs on behalf of the users. To ensure secure communication, authentication and authorization protocols are essential, requiring additional handling. However, this can be challenging to maintain because any change in API usage necessitates adjustments in the logic governing authorized access. This can lead to testing and deployment bottlenecks, particularly when managing microservices.
To address this issue, a Security Token Service (STS) can be used as a central repository to offload authorization logic from various components of the application. The primary role of STS is to issue tokens and validate claims, thereby managing scoped access to resources and streamlining authorization processes.
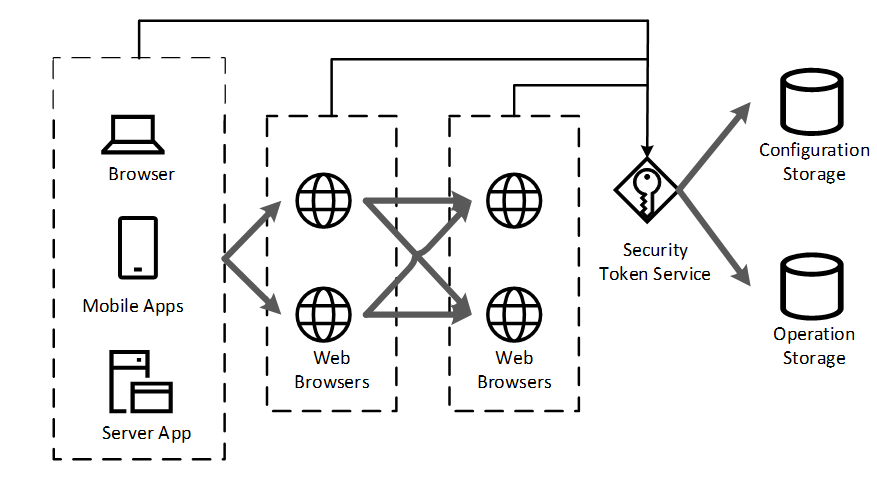
Let us look at the diagram below to get the overall idea of the security token service being used.

Figure 1: IdentityServer4 as Security Token Service
Using IdentityServer4 with NCache
IdentityServer4 is a frequently used STS in .NET Core applications. It implements the OpenID Connect and OAuth 2.0 protocols. The IdentityServer4 API provides the flexibility to use any external custom storage, be it a relational database, a NoSQL solution, a file system, or even an in-memory data store like NCache. Moreover, IdentityServer4’s support for Entity Framework (EF) Core simplifies the process of using various databases as storage for its configuration and operational data.
NCache, being a distributed, scalable in-memory key-value store, is a great fit for IdentityServer4. It can be used with IdentityServer in either of the following ways.
- NCache can be used as a cache store for IdentityServer4 configuration and operational data to speed up operations through in-memory caching as well as reduce database hits.
- To further increase the application performance, NCache can be used as a configuration and persistent grant store by eliminating the need to get data from a disk. The in-memory contents of the cache can then be periodically persisted to disk, significantly decreasing the average time taken to get the data.
You can use NCache, as a caching layer for storing configuration or as a standalone store for operational data. All this is implemented using the IdentityServerBuilder NCache extension methods used during ASP.NET Core dependency injection.
- Configuration store: A store where static data is kept which does not change as such.
- Operational store: A store where the operational data is kept on which operations are performed and is more likely to be frequently modified.
The upside of it is that it allows data to be stored in memory, resulting in faster access times. Before delving into the implementation details, it is important to address a few prerequisites to ensure a smooth setup process.
Prerequisites
- .NET Core 6.0 and 8.0 SDK and runtimes.
- NCache Enterprise 5.0 SP1 or onwards running on your server(s).
- Refer to the GitHub solution to get the information on application being used. Throughout the blog, the code changes are explained according to the same application.
Scenario 1: NCache as an In-Memory IdentityServer4 Store
NCache can store various types of data for IdentityServer, including client information, API resources, identity resources (configurations), as well as persisted grants and device flow codes (operations). This demonstrates NCache’s versatility as a storage solution.
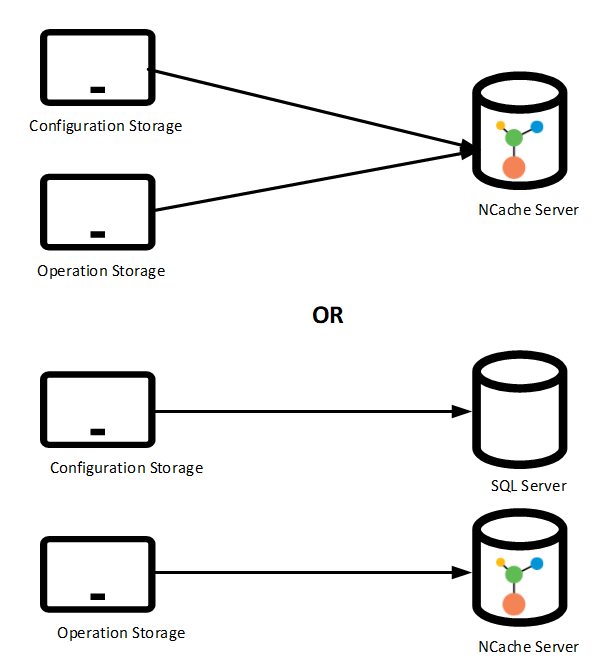
Let’s explore how NCache integrates into this system:

Figure 2: NCache as IdentityServer4 Storage
To use NCache for the configuration and operational data follow the steps mentioned below:
Step 1: Updating StartupNCache File
In the cs of your project, add UseStartup() method and add the following code in the StartupNCache.cs file.
Step 2: Modifying AppSettings File
In the appsettings.json file, modify the value of the CacheId key to the name of the cache you are using. Furthermore, for the multiple Servers keys, use a comma-separated list of one or more IP addresses belonging to the NCache servers making up the NCache cluster.
Step 3: Modifying AppSettings File
To observe how NCache functions as a configuration and operational store for IdentityServer4, run the applications IdentityServer, MvcClient, Api, and JavaScriptClient. Ensure that the demonstration cache, which serves as both a configuration and operational store, is active and connected to the IdentityServer sample application before running these applications.
Scenario 2: NCache as IdentityServer4 Cache Implementation
NCache primarily serves to cache data from your data source, enhancing access speed and overall performance. You can use NCache as a data store or place it between your data store and application, caching both configuration and operational data while retaining it in the data store.
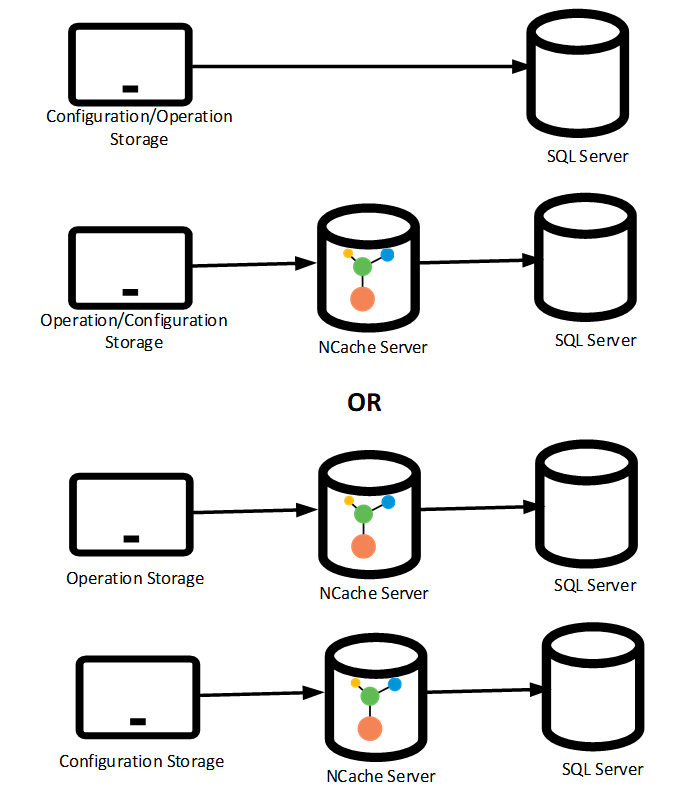
The figure illustrates how NCache operates as a cache with IdentityServer4.

Figure 3: NCache as IdentityServer4 Cache
To implement NCache as a configuration store while also persisting the configuration and operational data in the data store, follow the steps mentioned below.
Step 1: Updating StartupNCache File
Add the UseStartup<StartupEFCore>() method and add the following code in the StartupEFCore.cs file.
Step 2: Modifying AppSettings File
In the appsettings.json file, modify the value of the CacheId key to the name of the cache you will be using. Furthermore, for the multiple Servers keys, use a comma separated list of one or more IP addresses belonging to the NCache servers making up the NCache cluster. Also, provide the connection string of the SQL Server.
Step 3: Modifying AppSettings File
Run applications IdentityServer, MvcClient, Api, JavaScriptClient to see how NCache operates as a caching mechanism for the configuration store, the persisted grant store as well as the IProfileService default implementation. Make sure that the cache used as a configuration store and persisted grant store cache is running and can be connected to the IdentityServer sample application.
Conclusion
In summary, IdentityServer handles the necessary authentication at each network hop in your application, and NCache complements this by storing configuration and operational data for faster access. Additionally, NCache can serve as a primary data store for both types of data, potentially eliminating the need for other data sources. This functionality is easily implemented using the extension methods provided by NCache.


