We have been hearing about distributed caching market rapidly moving towards cloud computing. So, why should NCache stay behind? NCache, in this dark weather of COVID destruction, provides a silver lining to all Azure lovers in the form of NCache Cloud.
NCache Cloud encapsulates the overwhelming expertise of Microsoft Azure with a fast, scalable, high-performance distributed cache to support you even in the clouds. If you are using NCache on-prem software and want to switch your application to Azure cloud service, or if you haven’t heard of NCache and are interested in a cache assistant for your application on Azure, then this is the blog for you.
NCache Details NCache Cloud for Azure Getting Started Guide
This blog will provide a step-by-step guide for creating a subscription for NCache Cloud on Azure, how to create environments, and deploy resources in it.
Step 1: Create NCache Cloud Subscription in Azure
Your first step into embracing NCache Cloud is to create a new SaaS subscription in Azure through Azure Portal. Once you have access to your profile, go to SaaS and search for NCache in the marketplace. NCache provides both Enterprise and Professional service on Azure, so this is where you need to decide which one to use. I will be using NCache Enterprise for demonstration because let’s face it, Enterprise is pretty cool. If you are confused, please go to Edition Comparison to make the right decision.
When you have got your eyes on the perfect offer, I want you to click on it. This offer comes with different plans, the details of which are:
- Pay as You Go: NCache usage will be charged on an hourly basis.
- 1-Year Reserved: NCache usage will be charged yearly.
Select your plan and click on the Setup + subscribe button.
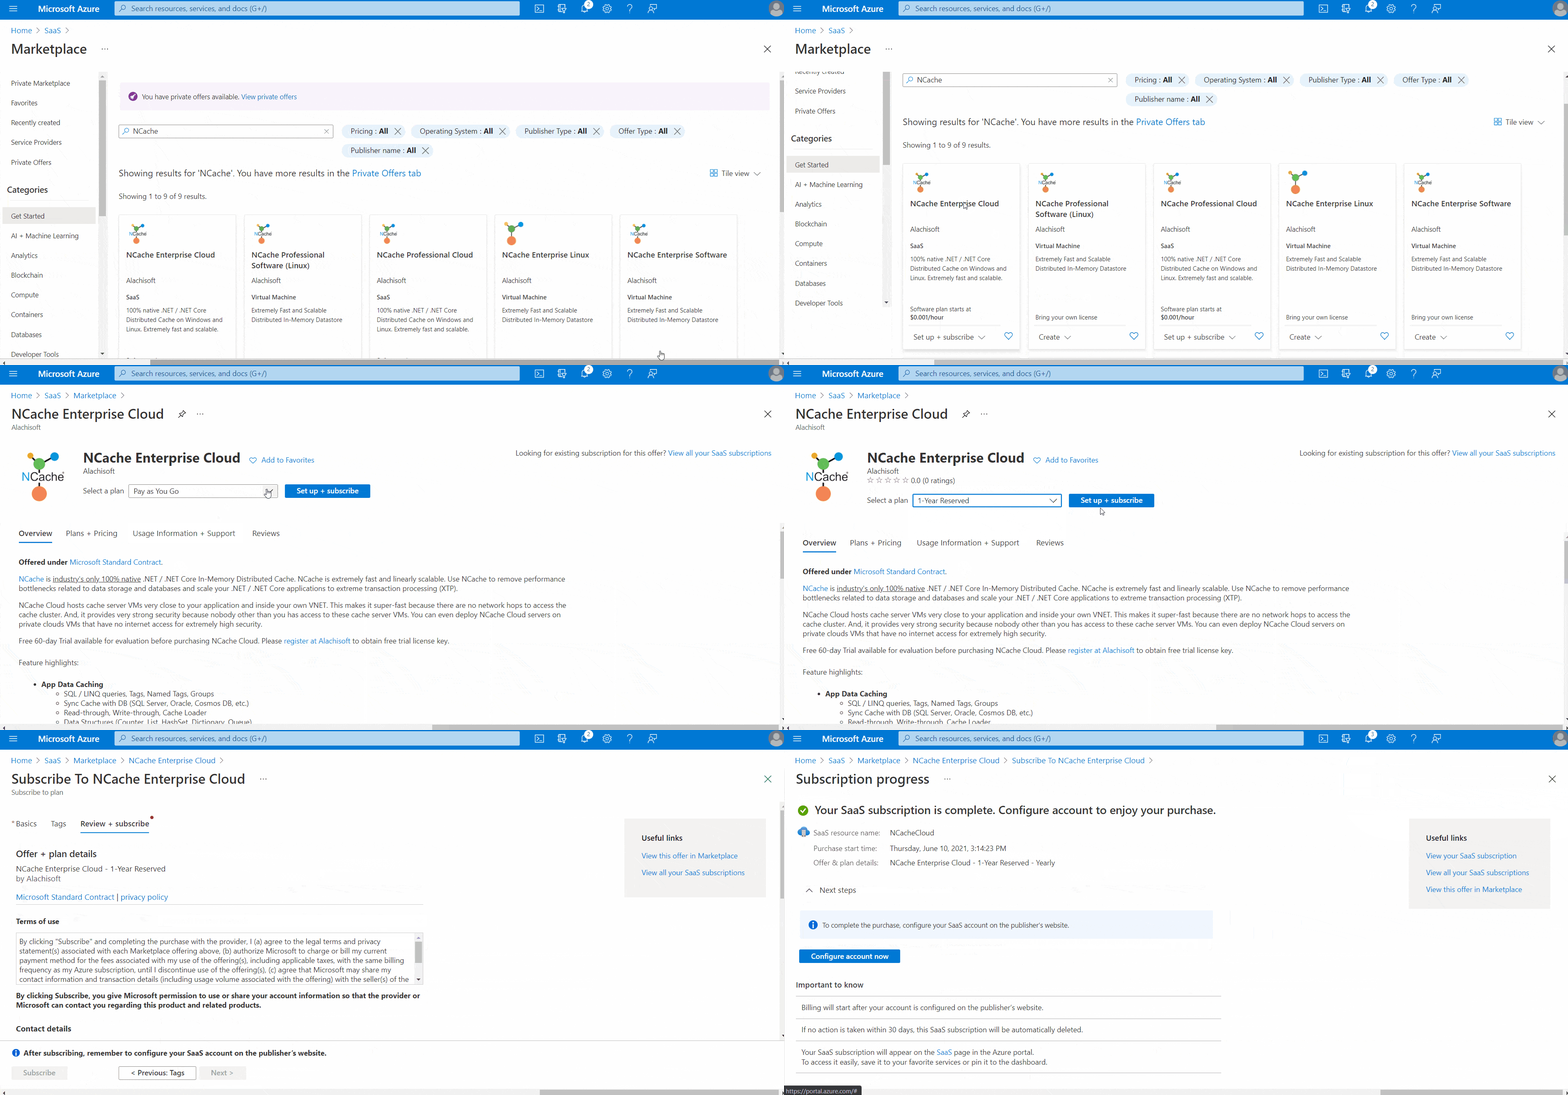
GIF 1: Subscribe to NCache Offer on Azure Marketplace
Step 2: Complete NCache Cloud Purchase
On NCache Cloud Portal, select and purchase the plans from the form. You can purchase these two plans (either/or or both) for 1-Year Reserved subscription:
- Server-Only Plan: Purchase servers and connect unlimited clients with them.
- Client-Server Plan: Purchase a specific number of servers and clients to connect with them.
When done, go to the Review and Purchase section to confirm the subscription or edit it if required.
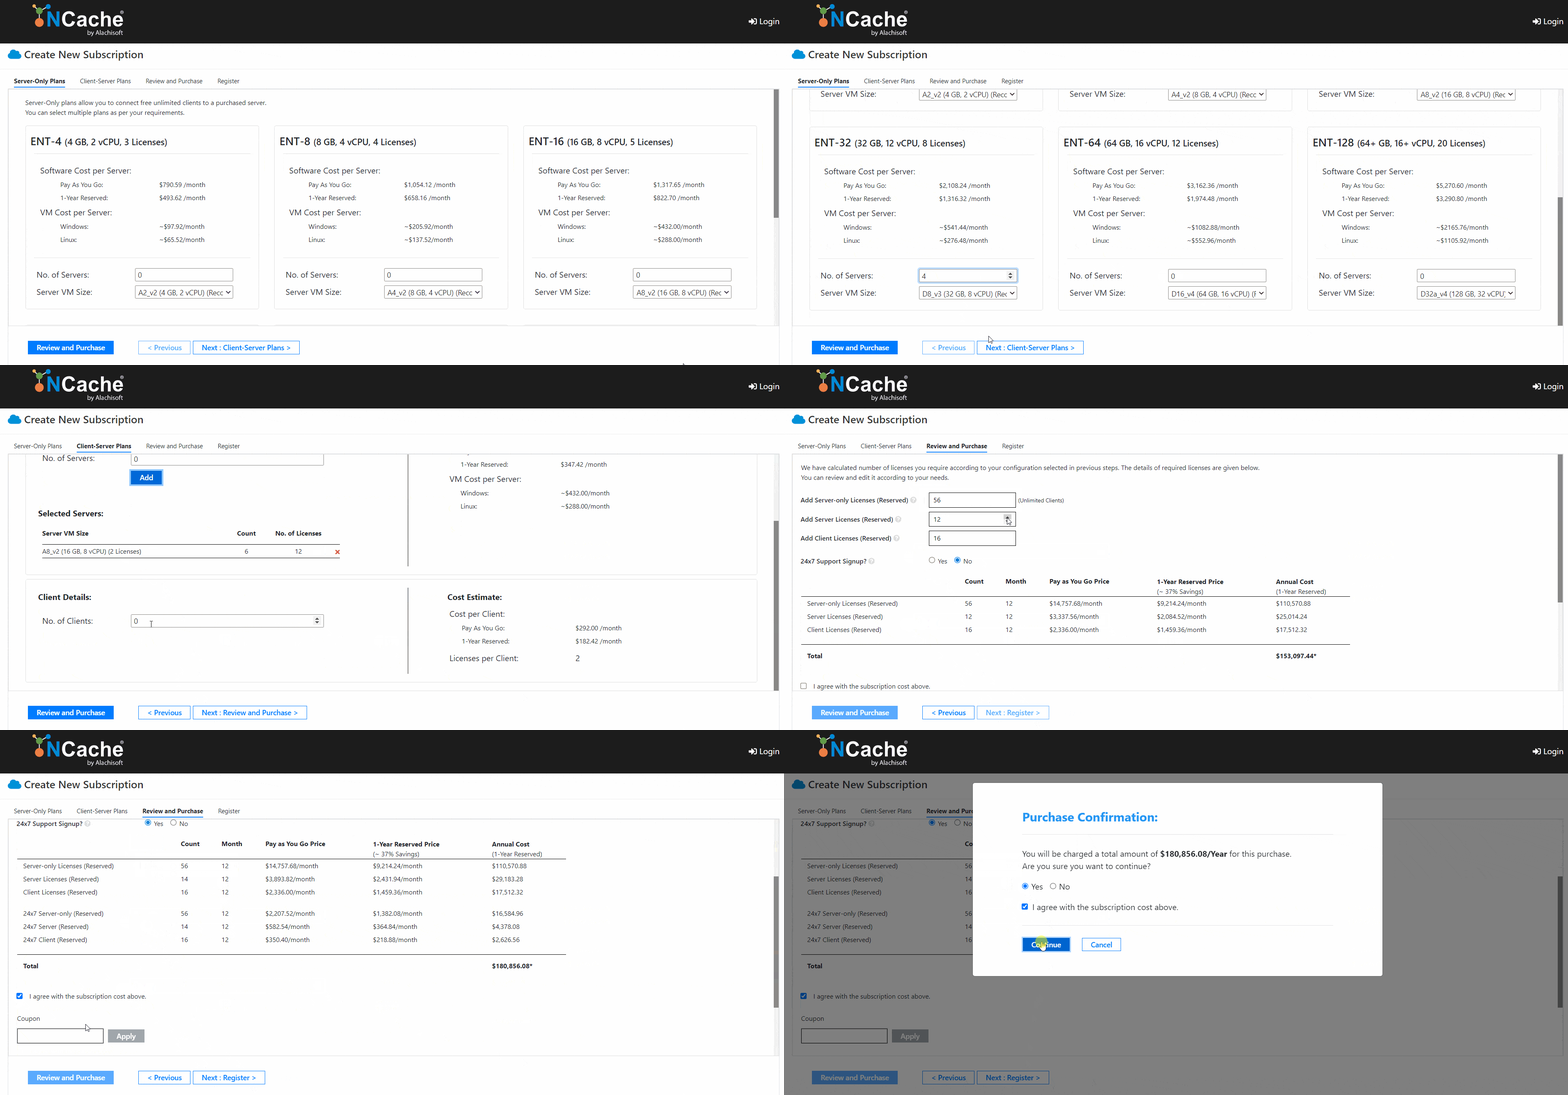
GIF 2: Purchase NCache Plans
Step 3: Register Account Details
To complete the subscription purchase from NCache Cloud Portal, you need to register a user account with this subscription as shown below:
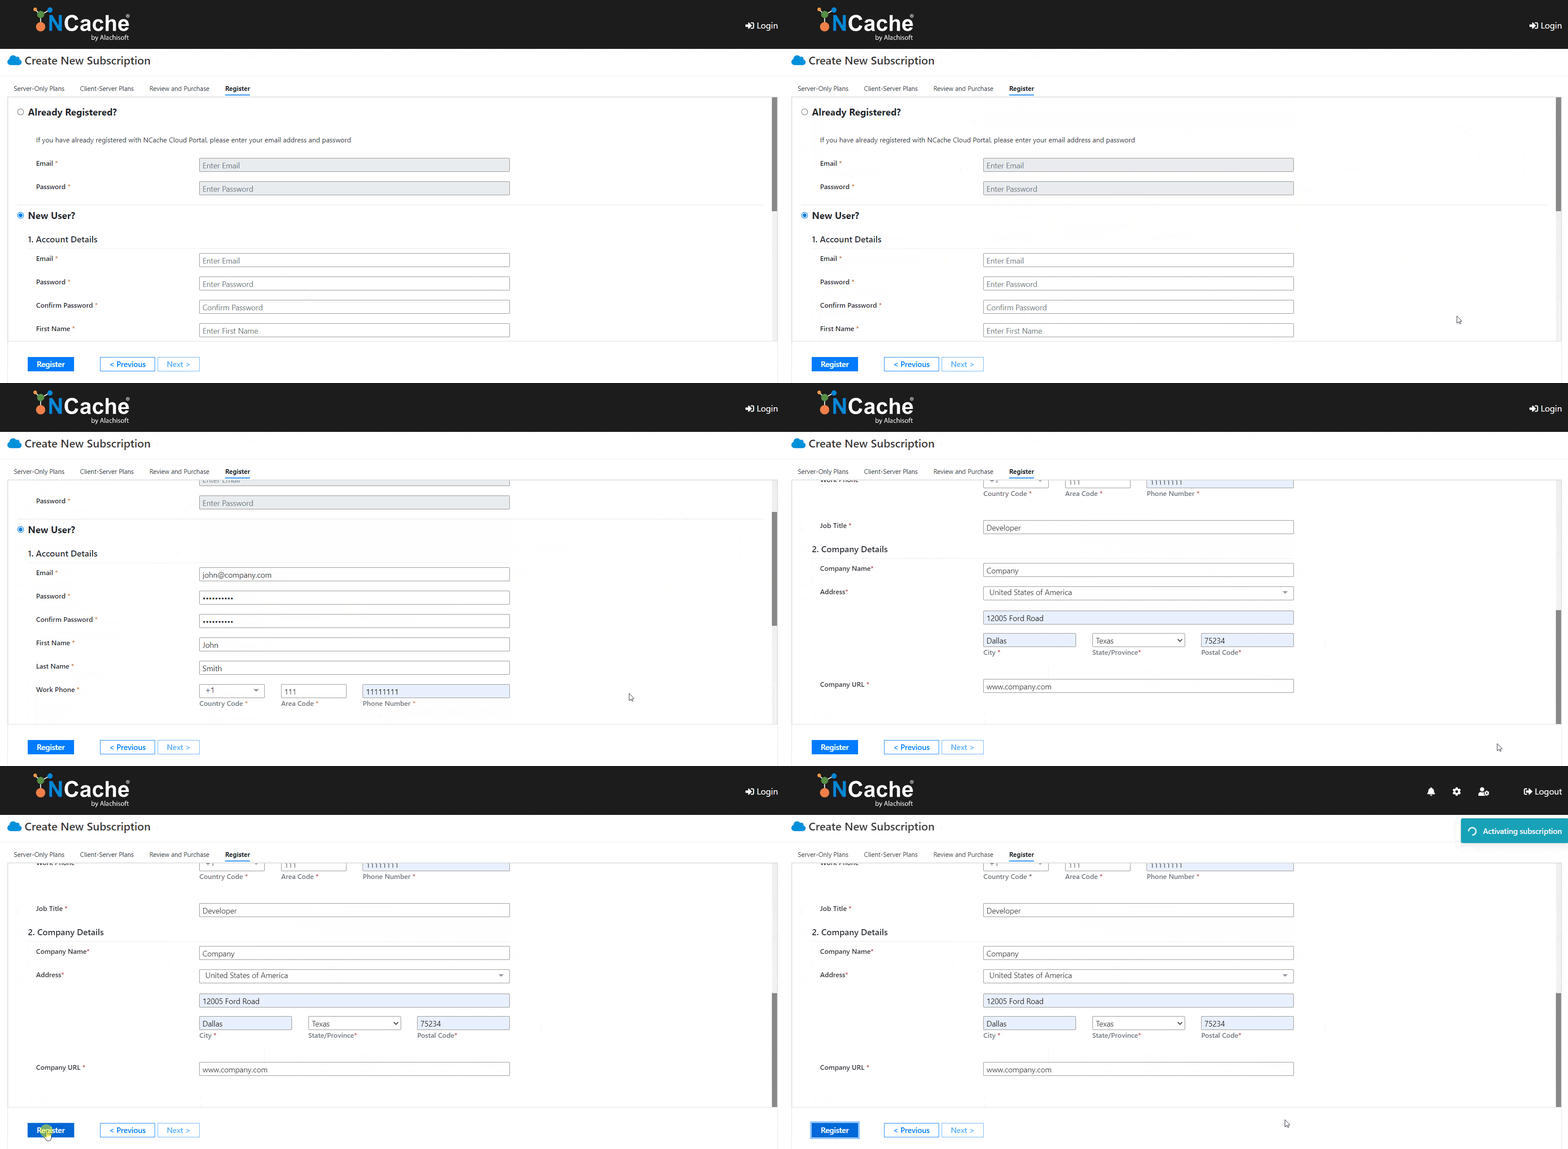
GIF 3: Register Account Details
If you already have an account registered with NCache Cloud Portal, then you do not need to do any of this; simply provide your account details in the Already Registered? section.
NCache Details NCache Cloud for Azure Getting Started Guide
Step 4: Select Deployment Method
Now that you have an active NCache Cloud subscription in Azure, let’s get your environments set up. There are two ways through which you can deploy an environment in your subscription:
- Automatic Deployment: This method allows you to auto deploy resources in your subscription through NCache Cloud Portal. This deployment of resources requires you to provide information of a deployment user that has Azure Directory access on resources in your subscription.
- Manual Deployment: This method allows you to manually deploy resources in your subscription without the need of any deployment user.
Automatic Deployment of Resources
If you choose to deploy resources through NCache Cloud Portal to save time and energy, you will first need to provide the portal with deployment user credentials. If you don’t have a deployment user in Azure subscription, do not worry, cause the portal will take you through every step.
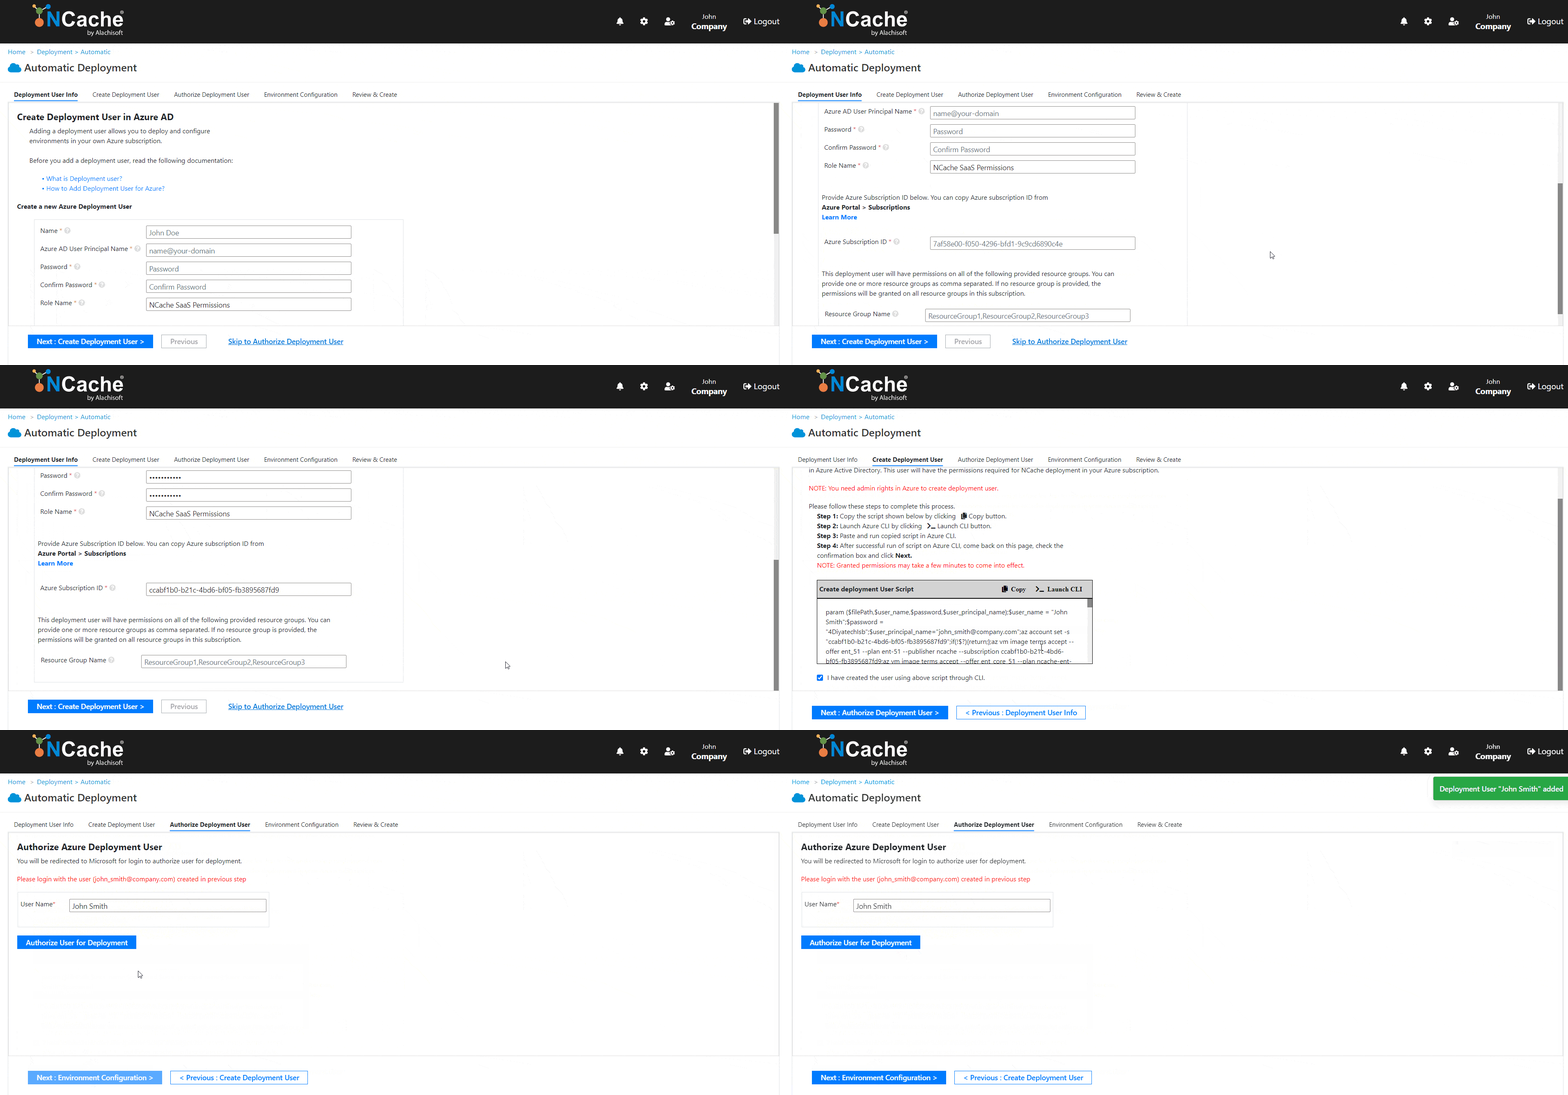
GIF 4: Deploy Resources through Automatic Deployment
Manual Deployment of Resources
In case you opted for manual deployment of resources to secure vital information, you can still create and deploy resources in your subscription by following these steps:
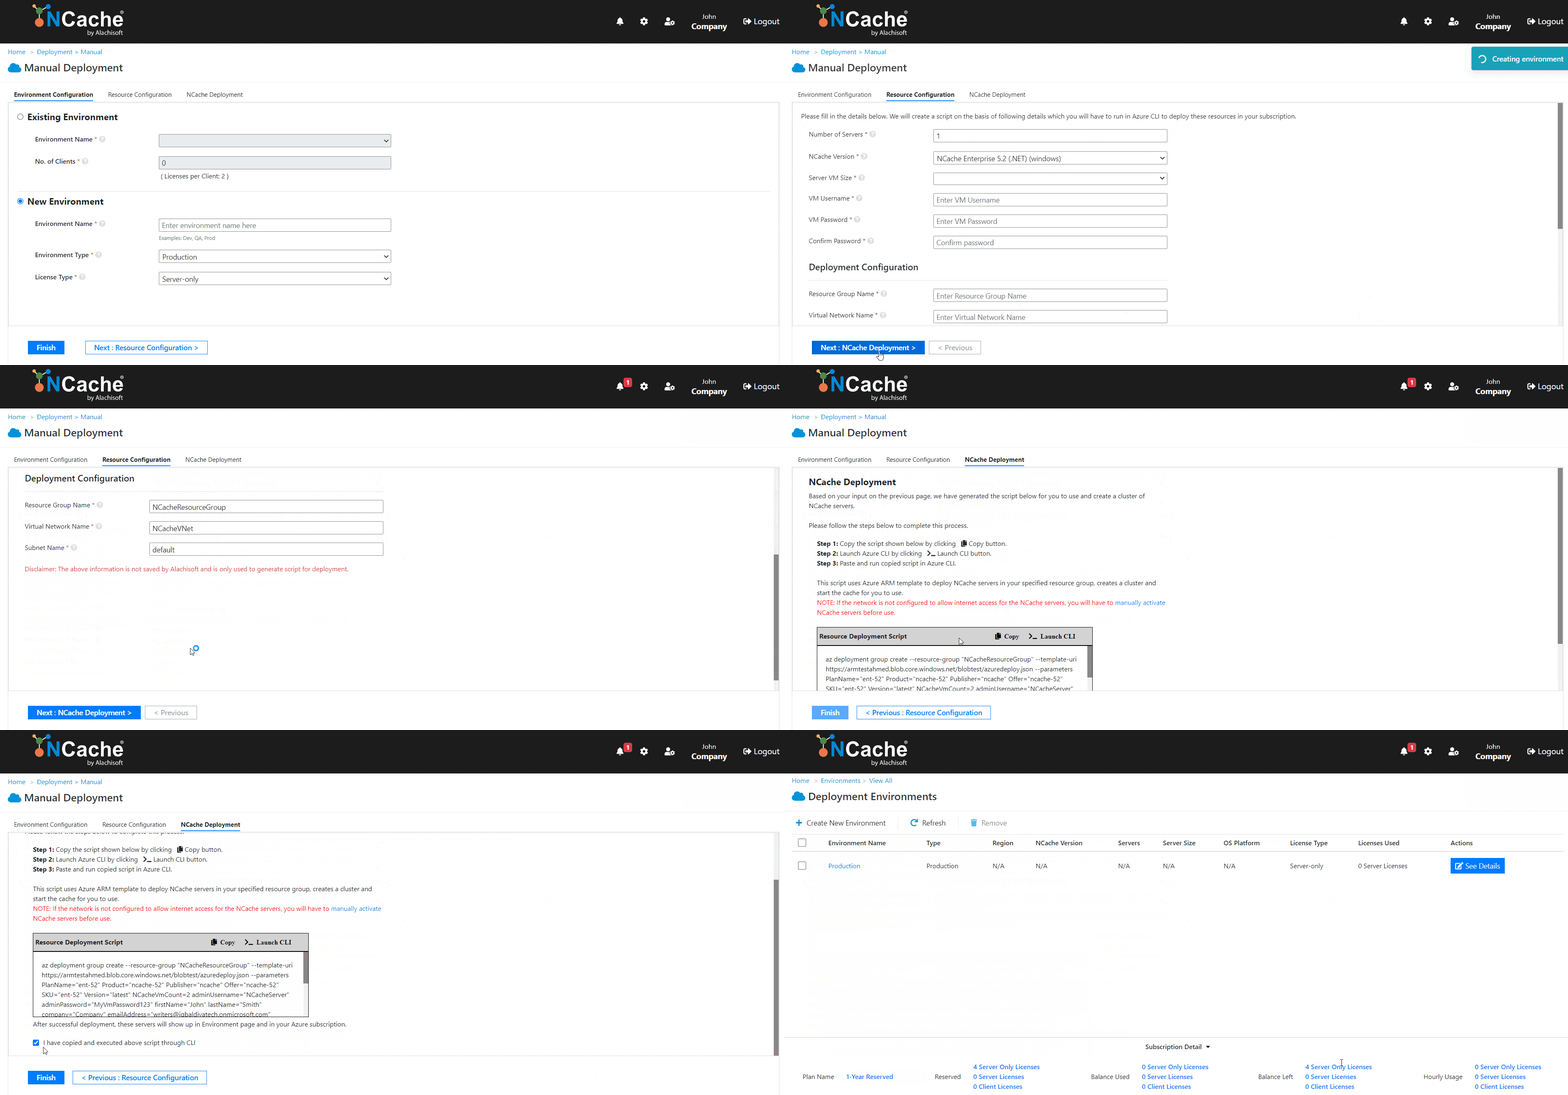
GIF 5: Deploy Resources through Manual Deployment
Step 5: Connect to Deployed Server
Now that you have servers in your environment, you need to access those server machines to start using NCache in them. You can easily connect to deployed machines through NCache Cloud Portal. Just do what I do:
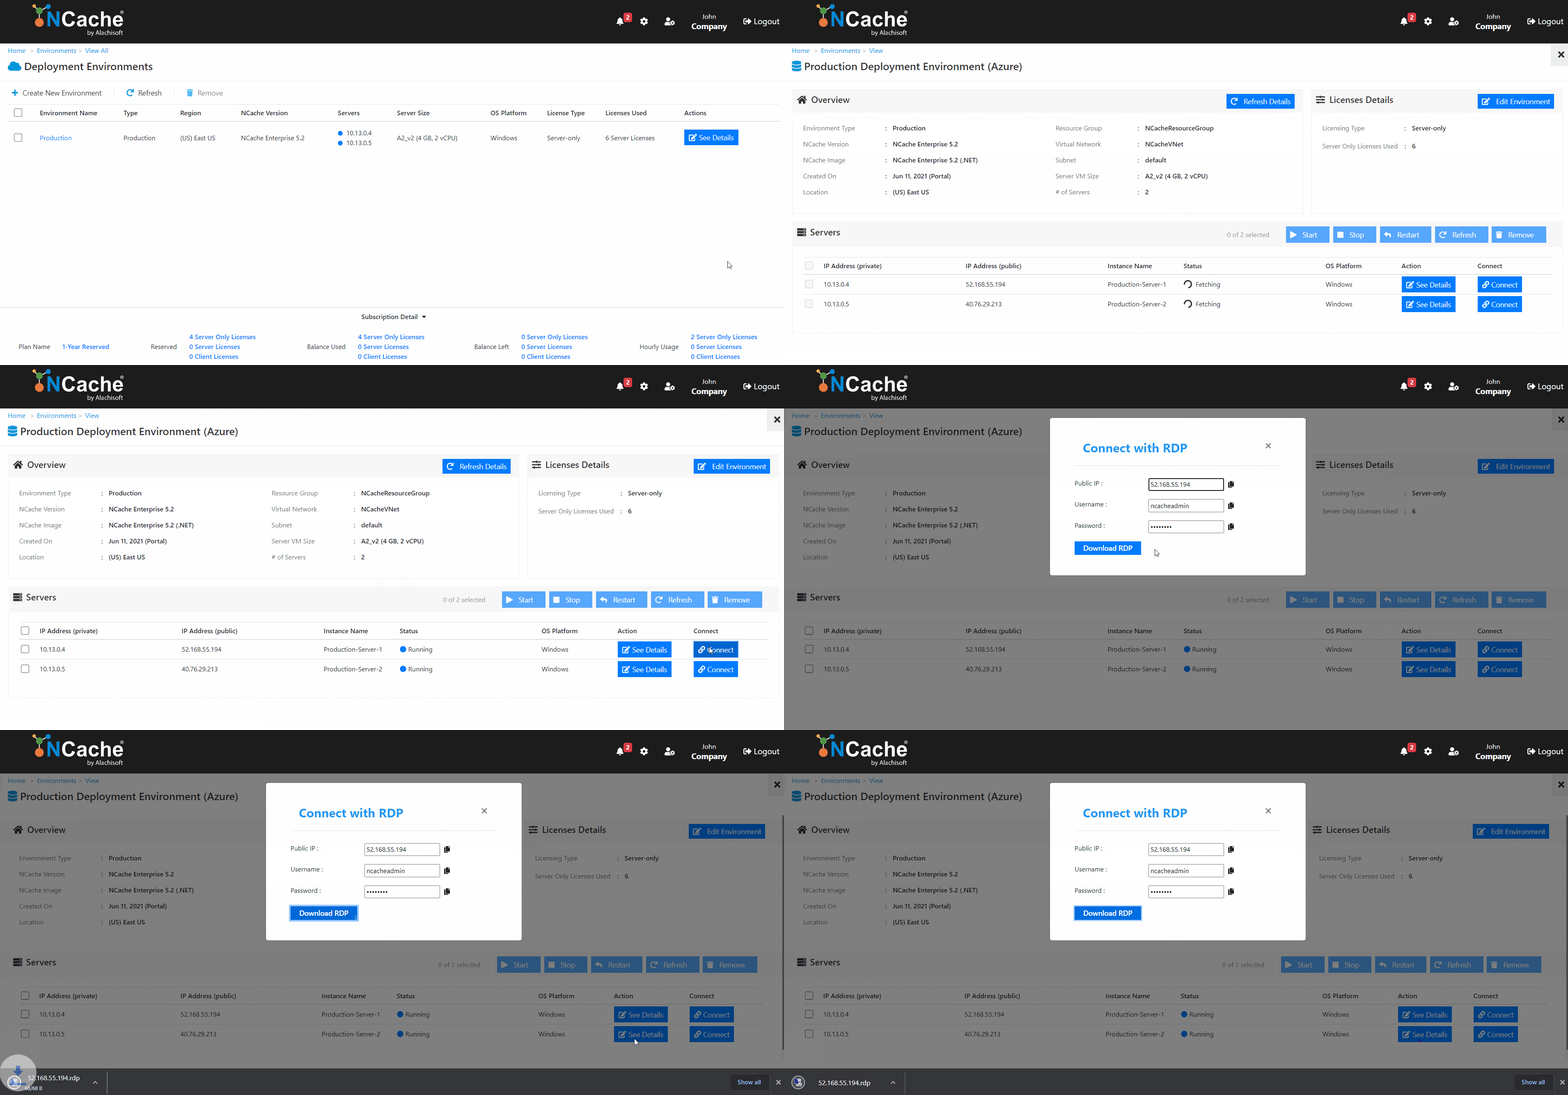
GIF 6: Connect to the Deployed Server
Step 6: Configure NCache Cluster
Inside the VM, you will have NCache activated for you, so you can start creating cache clusters inside. NCache Cloud also supports auto-creation of cache clusters when you are creating an environment, but in case you skipped that step, here’s another way of creating a cache cluster. Let’s follow these humble steps to configure a demo cache cluster inside the NCache-activated VM. In case your VM is not NCache activated, you can still use it by manually activating NCache in it.
Create a Demo Cache Cluster
Just to give you a little demo of how to proceed with creating an NCache cluster inside the connected machine, I have created this small video that shows the steps you need to take to create your own cluster.
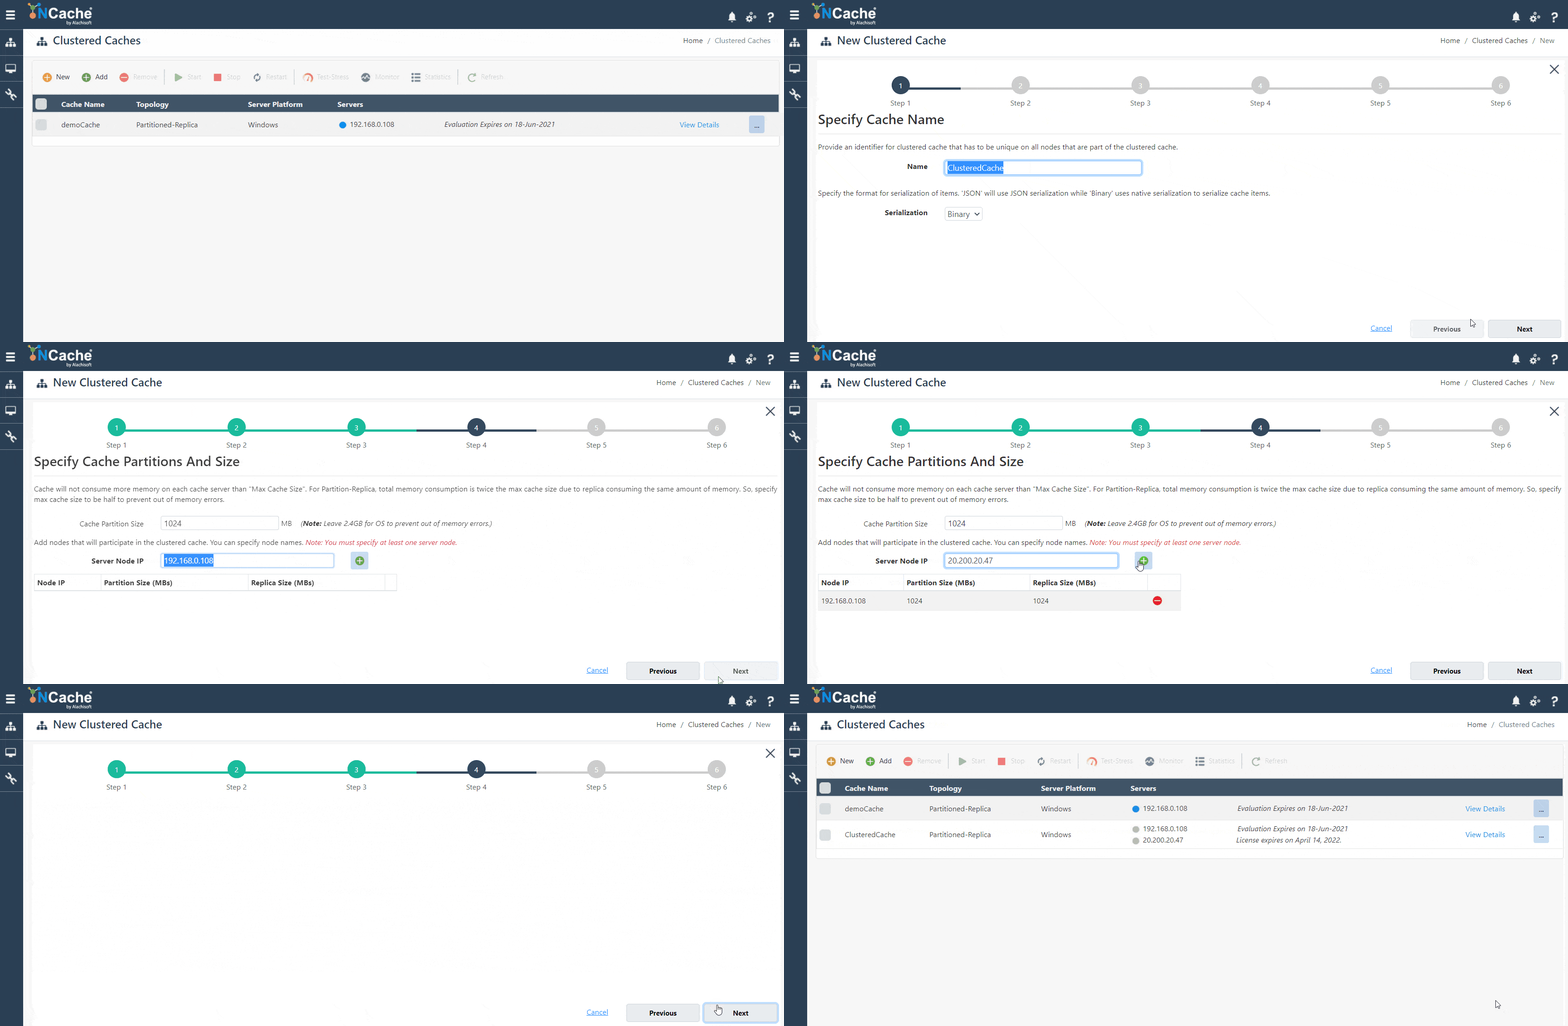
GIF 7: Create a Demo NCache Cluster
Perform Management Operations on Cluster
Creating a cache cluster isn’t it, I have got to show you how easy it is to perform management operations on the cluster as well. Let’s play around with the cluster, shall we?
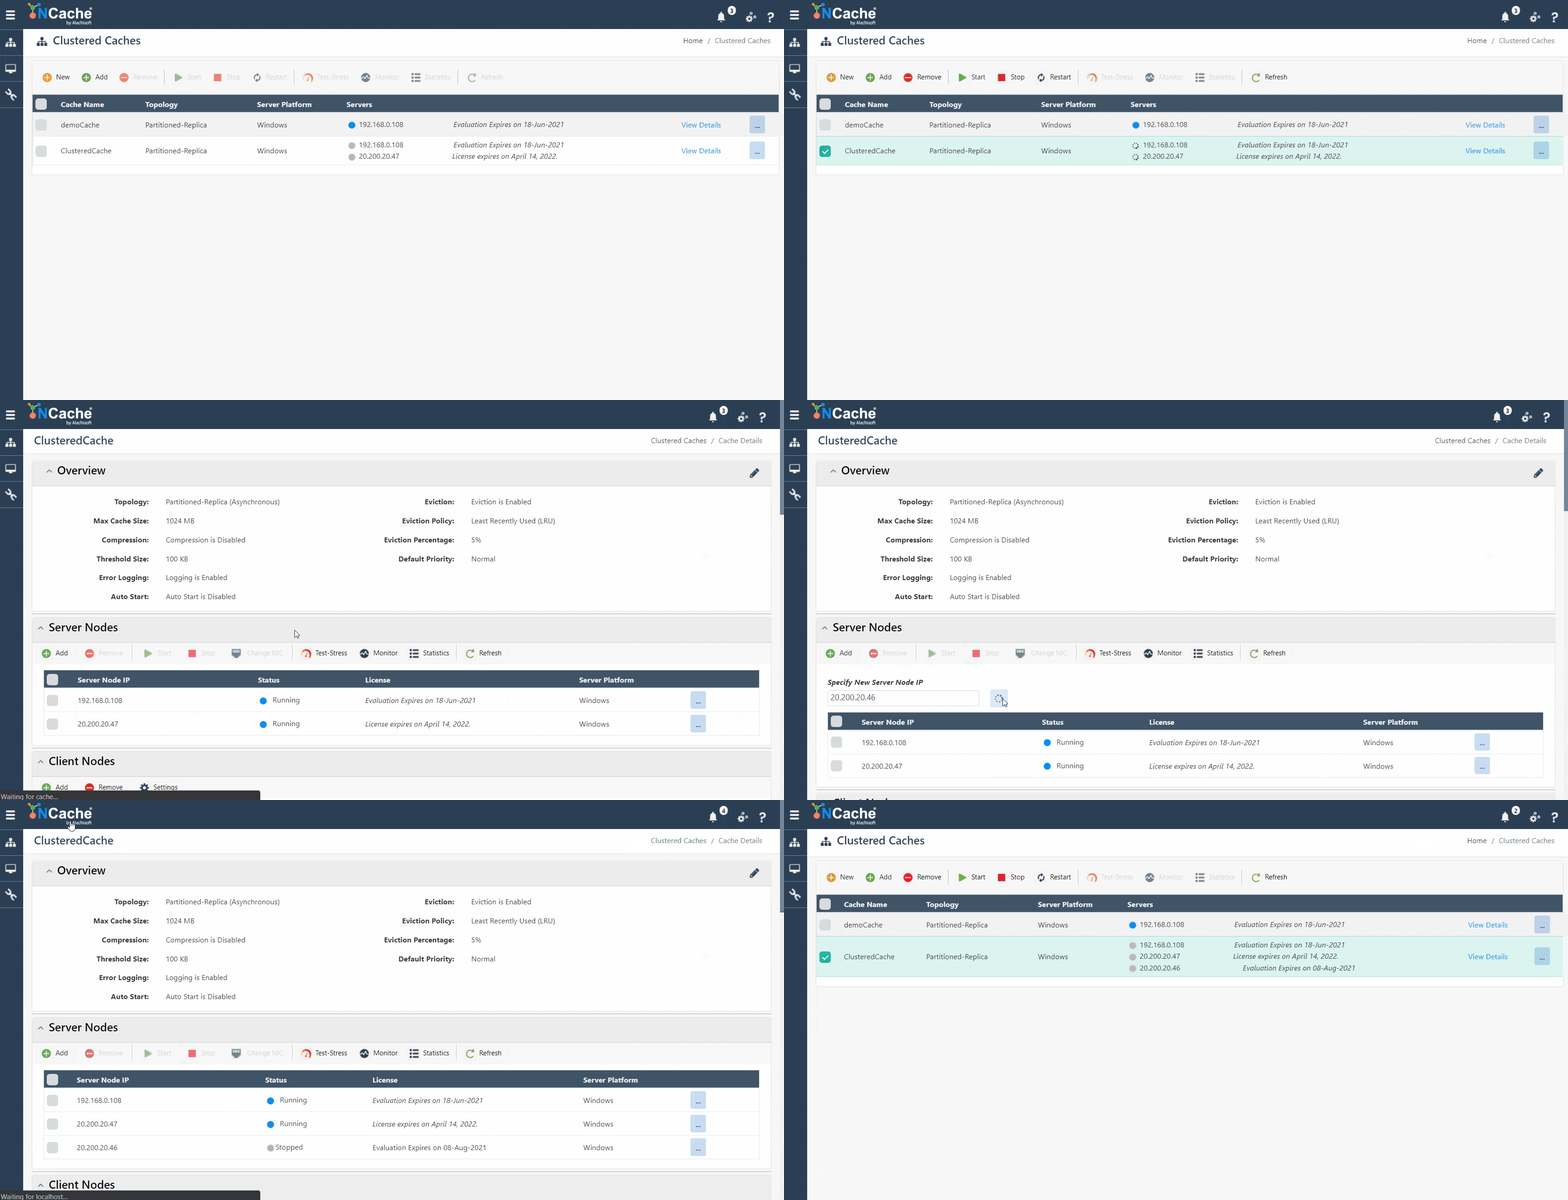
GIF 8: Perform Management Operations on Demo NCache Cluster
Monitor Health of Cluster
NCache does not leave you any loopholes where you might have to stop and contact our support team for help. Which is why I am going to show you how you can monitor the health and stats of your created cluster.
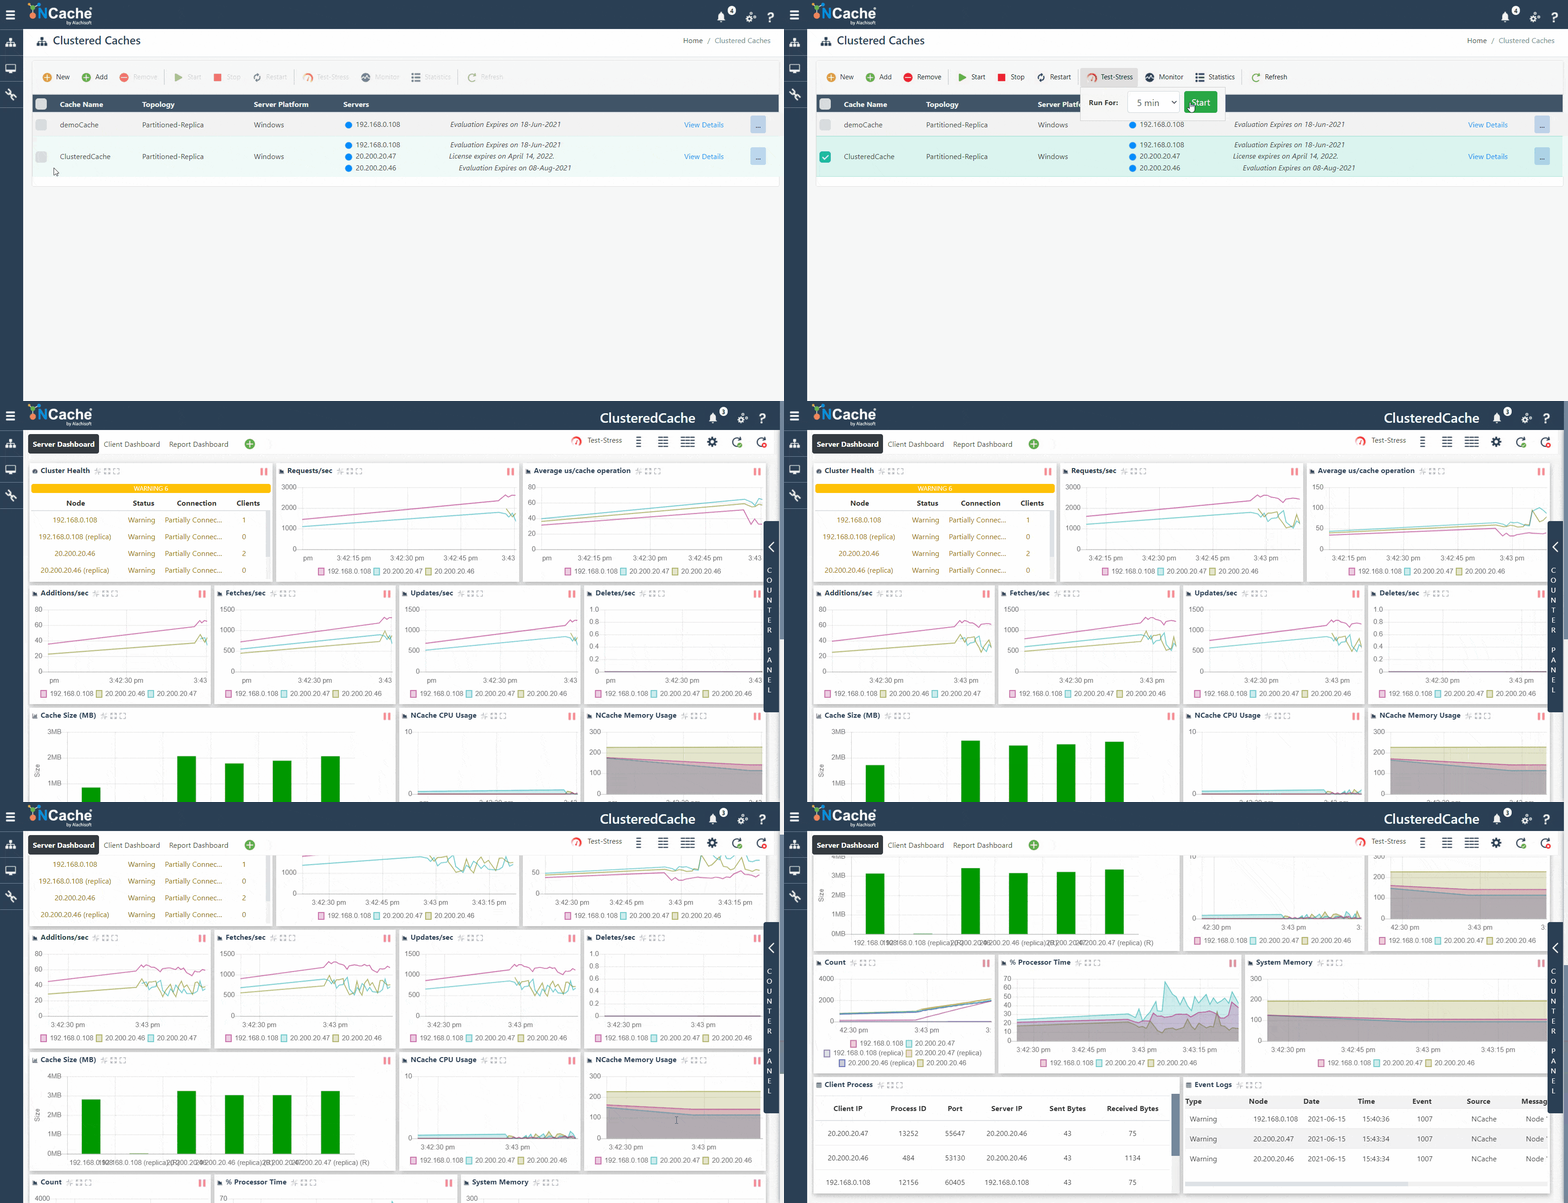
GIF 9: Monitor Demo NCache Cluster Health
Now that you have a running NCache cluster inside your environment that’s part of your active Azure subscription, then why don’t you configure NCache with your application, the reason why you went through all this trouble. To master the new NCache Cloud Portal, refer to Administrator’s Guide for NCache Cloud which explains in detail how to use the portal to get the best out of NCache on cloud.
NCache Details NCache Cloud for Azure Administrator’s Guide
Quick Overview
Alachisoft deployed NCache on Azure so that managing your application and the infrastructure of your environment becomes a whole lot easier for you. All you have to do is follow the steps provided in this blog or in our detailed guide on Getting Started with NCache Cloud Service and you are set to earn some money. If you liked what you read, then there’s plenty more where that came from. Go to NCache Blogs to find out what NCache is up to.


