Gone are the days when one of your servers crashed and you had to reconfigure it from the ground up. This would include a tedious, manual process from inspecting hardware malfunctions to software glitches. Now, organizations have adopted on-prem scripting tools to automate tasks and shifted the provisioning of IT infrastructure to cloud. However, this still does not take away the risk of human error while configuring resources and the time and cost to configure each desired machine on the cloud.
To tackle these issues, Infrastructure as Code (IaC) helps you automate the deployment of the whole infrastructure just by running a script where you only provide your hardware and software requirements and the rest is handled by the cloud. You don’t have to run the script or provide configuration for each machine being provisioned; this repetitive task is handled by Infrastructure as Code itself. This minimizes the risk of any deviations in the configuration for each server being provisioned.
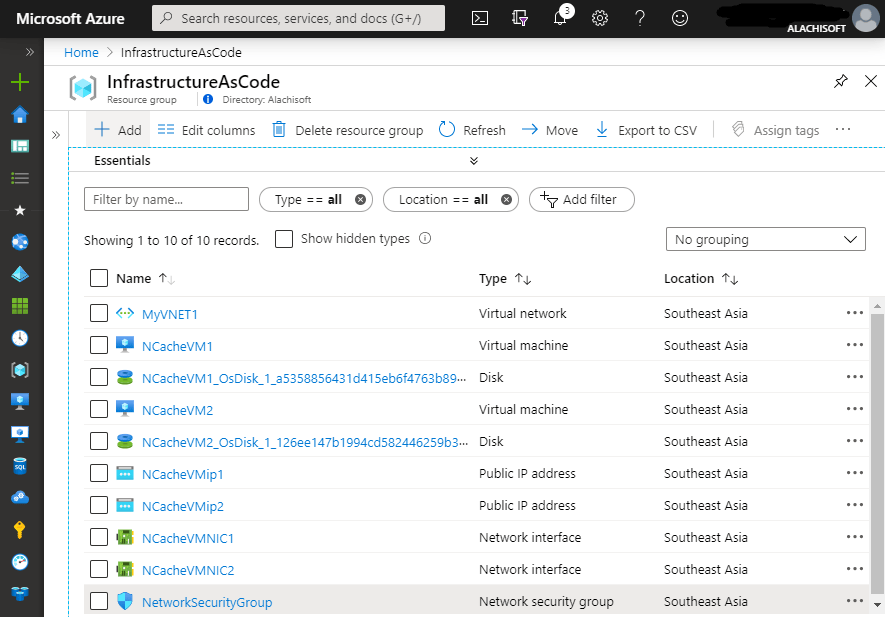
Many NCache users opt to use and deploy NCache on Azure. Generally, you set up the VNet, deploy VMs to install NCache, create caches, and connect your application to the cache cluster. NCache makes Azure deployment even easier with an Infrastructure as Code solution on GitHub in the form of an ARM Template.

Figure 1: NCache deployed through Infrastructure as Code in Azure
ARM (Azure Resource Manager) template is a JSON file that contains parameters, variables, resources, or anything needed to automate Azure deployment. In NCache managed ARM templates, you only need to provide configurations in these files (more on this later) and deploy the ARM template using Azure PowerShell:
- azuredeploy.parameters.json: azuredeploy.parameters.json contains the end-user parameters like cache configurations, virtual machine/network, licensing information, and so on.
- azuredeploy.json: azuredeploy.json contains information on which resources are to be deployed, like the NCache image. This is a template for the .parameters file.
Moreover, you can activate NCache through the ARM template or use it for evaluation.
NCache Details NCache Infrastructure as Code GitHub Solution
Quick Example of Deploying NCache
If you are looking to evaluate NCache performance under peak loads or how seamlessly it scales, you can deploy NCache in Azure through Infrastructure as Code. Azure provisions the resources required by your application, so you’re simply handed with a ready-to-serve NCache cluster. All you need to do is connect your application to this cache cluster.
Once you have provided the required parameters in the NCache managed ARM template, you deploy the template through a simple script executed in Azure PowerShell. This will perform the following tasks for you automatically:
- Create a cache with the provided parameters
- Create a cluster with NCache nodes
- Start cache on all nodes, providing you a serving cache
Using the default NCache ARM template on GitHub, you can deploy a running cluster of three caches, AppCache, SessionCache, DataCache by executing the following command in Azure PowerShell:
After you run this script, the deployment changes and progress are displayed on the terminal. You can even log this progress for later audit. Progress includes validations of the template file structure or parameter input validity. This helps diagnose any problems in the deployment early on, as deploying through Azure Portal only prompts any error in deployment after the whole process takes place.
Quickly Setup 60-Day Free Trial Thru ARM Template
NCache provides free evaluation for 60 days in a BYOL model in Azure. If you want to evaluate NCache, you can easily do it with a single click deployment of NCache in Azure using Infrastructure as Code. The rest is handled by the NCache ARM template on its own. All you need is to add a client machine to that deployed cache and proceed to use and evaluate NCache. Yup, it is that simple!
Easily Deploy Environments with ARM Template
No matter what environment you are working on, deploying NCache with Infrastructure as Code takes away the risk of error or deviations in reconfiguring the environment by automating cluster and VM creation. You can deploy any environment with ARM template as follows:
- Production/Staging: In these environments, you definitely cannot afford any error and delay in redeployment. This is why it is extremely important to make sure a single verified parameter file is deployed every time without having to rewrite configurations. Moreover, if NCache is deployed in one region in production, and you want the same deployment in another region, you can easily do so using the same ARM template. This reduces any chance of human error in reconfiguring as you can simply reuse the template.
- QA/Dev: For the Dev environment, if you want to test your application with NCache in Azure, you will need to redeploy the cluster every time you want to verify your piece of code. Similarly, for QA which has to test incremental builds, redeployment is a hassle that can be automated through ARM templates.
Azuredeploy.parameters.json Parameter File
The azuredeploy.parameters.json file in the NCache ARM Template on GitHub contains the end-user parameters, which provide the basis of the configuration for your Azure deployment. For NCache, this mainly includes cache settings, network/VM settings, and licensing (if needed). This is where you customize your deployment. If you don’t want to use the default provided configurations in this file, you can make changes to this file before deployment.
Cache Settings
You can specify your cache settings like all cache names, their respective topologies, and sizes, the number of clients for each node, environment name, and more.
Network/VM Settings
In the azuredeploy.parameters.json file, you can specify the configurations for your resources like virtual network and virtual machines. For example, if you want a different VM size than the one in this file, you can change it through this file according to your requirements.
License Activation
NCache provides BYOL licensing on Azure. If you want to activate NCache, you can do so by providing the License Key obtained from NCache Support and additional credentials like First/Last Name, Email, and so forth. NCache handles the activation process internally once you provide the parameters and deploy the file.
NCache Script File
NCache handles all functionality like cache creation, license activation, etc in the NCacheConfiguration.ps1 file. This file requires no user intervention, except creating the blob storage URI of the “NCacheConfiguration.ps1” file and providing the path to the storage before deploying the template. This step is mandatory.
NCache Details NCache Infrastructure as Code GitHub Solution
Azuredeploy.json Template File
The azuredeploy.json file in NCache managed ARM template on GitHub contains the resource information of your deployment and validations for the azuredeploy.parameters file. Basically, this is the meat of your deployment. Normally, you won’t need to change this file except if you want to switch to a new version NCache image.
Resource Information
This contains information on all resources like the NCache image to fetch, virtual machines, dependent resources like network interface cards (NICs), virtual network/security groups, and so on. The following is a small snippet showing virtual machine information for your NCache deployment and how it depends on the network interface resource.
NCache Image Information
As mentioned, you don’t need to change anything in the azuredeploy.json template file. However, if you have been using an older version of NCache and want to use the latest NCache image for your deployment, you need to make the required changes in these two key-value pairs in the “resources” section:
Parameter Metadata
Moreover, this file contains metadata for the parameters for each resource, like input type, min/max values, default values, allowed values, and more. This acts as validation for the parameters you provide in the .parameters file.
For example, for the file snippet below, if you add NCacheVmCount as “one” (string) instead of an integer value, or if you provide the value as 0, you will be prompted with an error once you execute the NCache deployment script in PowerShell because it does not comply with the template for this value.
Testing Template Changes Thru Azure Portal
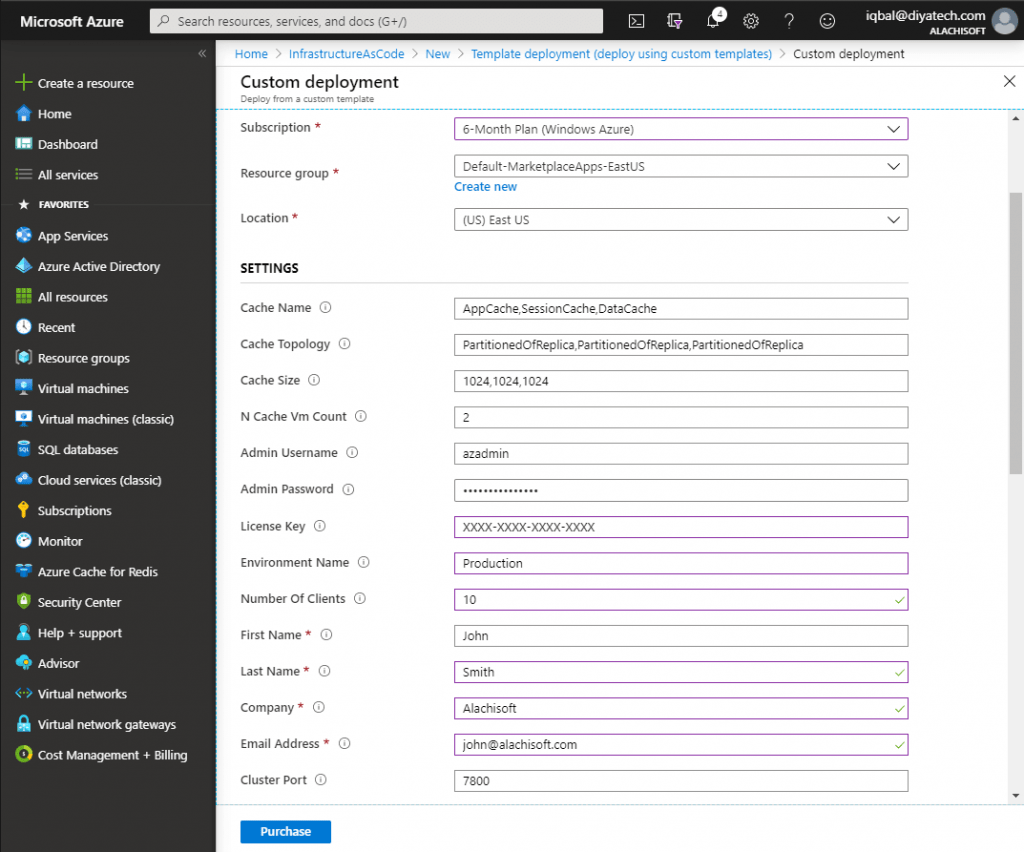
You can copy-paste your customized parameters file (azuredeploy.parameters.json) into Azure Portal to verify if your template is error-free and complies with the parameter metadata in the template file (azuredeploy.json). If all fields are populated without any prompt such as invalid parameter, it means you’re good to go with deploying NCache in Azure!

Figure 2: NCache Infrastructure as Code ARM Template in Azure
NCache Details NCache Infrastructure as Code GitHub Solution
Summing it Up
With deploying NCache on Azure through Infrastructure as Code, you not only automate your critical tasks of configuring resources, you also drastically reduce human error and ensure consistency of configurations. Moreover, using NCache managed ARM templates, it’s easier to log and test any deployment change, just like you do with your code. So a single-click deployment of NCache in Azure is all you need for achieving extreme performance and scalability of your applications!
NCache Details Download NCache Edition Comparison


