In today’s world, deploying applications using the cloud has become standard practice. One of the most well-known cloud platforms Amazon Web Services (AWS), offers a variety of services to its subscribers. NCache takes advantage of this infrastructure with NCache Enterprise Cloud. It spins NCache servers, and your subscription being either Azure or AWS, so that you can quickly use NCache cloud free for 60 days without having to install the infrastructure as a whole.
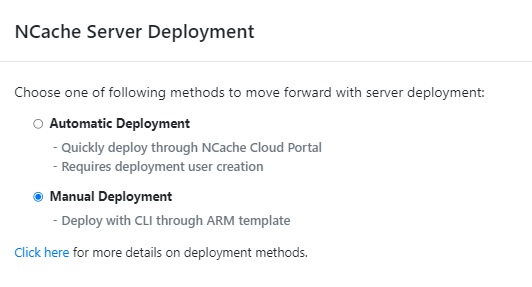
In your chosen subscription, NCache Enterprise Cloud spins NCache server VMs based on the number of servers you require. As part of this you get pre-installed VMs where you just have to create a cluster and begin your operations. As with most other cloud applications, you can deploy NCache Enterprise Cloud in a number of ways, specifically Manual and Automatic deployment.
This blog focuses on deploying resources manually in AWS. Unlike automatic deployment, where you are required to give the application certain access rights – Manual Deployment uses scripts and more to overcome this hurdle for those hesitant to do so. However, you can check out the blog on Automatic Deployment, if you feel that approach would work better for you.

Figure 1: NCache Enterprise Cloud AWS Deployment Methods
How to Manually Deploy NCache in AWS?
The steps required for manual deployment are as follows.
Step 1: Account Registration in AWS
Users must sign up for an account and subscribe to the SaaS product on AWS in order to use NCache Enterprise Cloud (Free 60-Day Trial). To do this, they must enter as a root user to the AWS Marketplace, search for NCache Enterprise Cloud, and then choose the desired product.

Figure 2: Search Result for NCache Enterprise Cloud on the AWS Market Place.
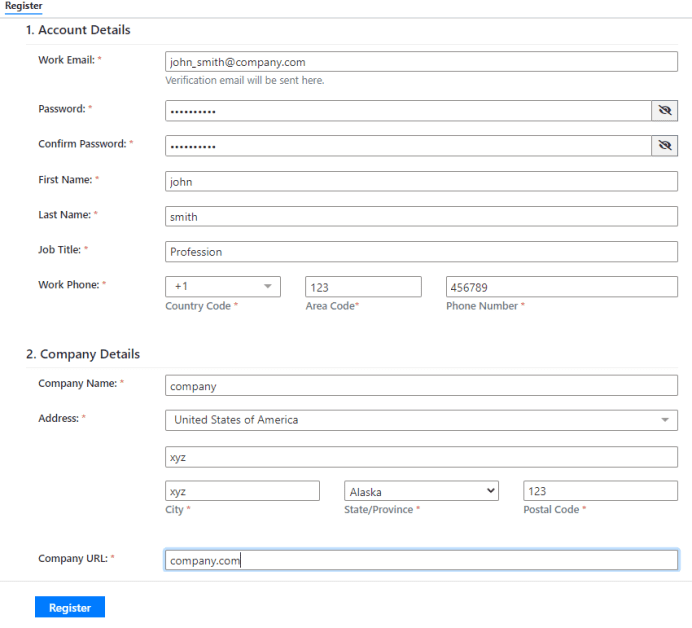
After creating a contract with the vendor, users can register for an account on the NCache Cloud Portal by providing their account and company details. To verify their identity, new users must fill out a registration form and obtain a one-time password (OTP).

Figure 3: Registering a New User in AWS
Step 2: Create Key value Pairs to Access the Machine
Upon successful registration of account, you will be notified and asked to pick your deployment method of choice, but before you can proceed with your process, you need to configure a Key-Value on EC2. Which is necessary for access to the deployed VM.
You can do so by using the AWS Console to create key value pairs. This will require you to head to EC2 via Services on your AWS Console. And choose to create a Key Pair from the Network & Security menu and enter the information as required. With this added security, you can make sure that only authorized users have access to your resources.
Step 3: Resource Configuration
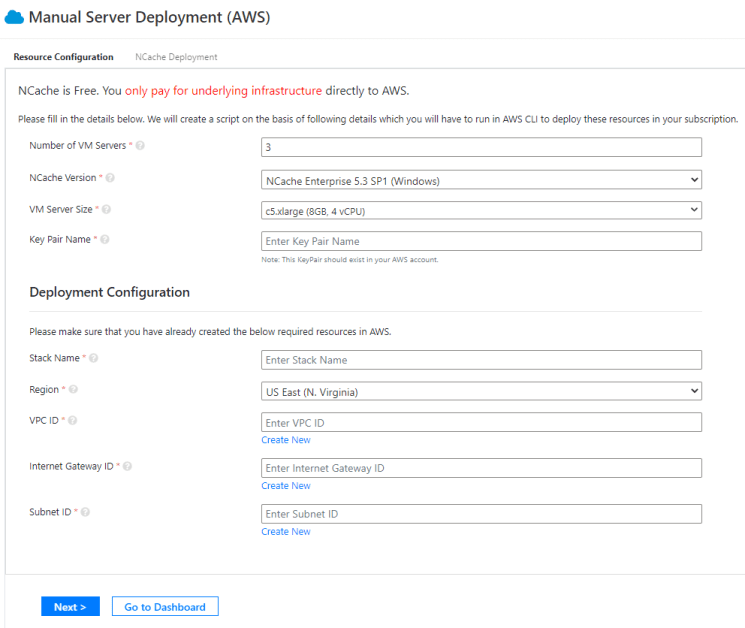
Configuring resources for deploying virtual machines in AWS includes choosing the size of the virtual machine, the login credentials, and vendor-specific information. For AWS, you’ll need the deployment region along with the relevant VPC (specifically its ID), VNET, Internet Gateway ID, and Subnet ID as parameters.

Figure 4: Manually Configuring Resources in AWS
Step 4: Deploy NCache Servers
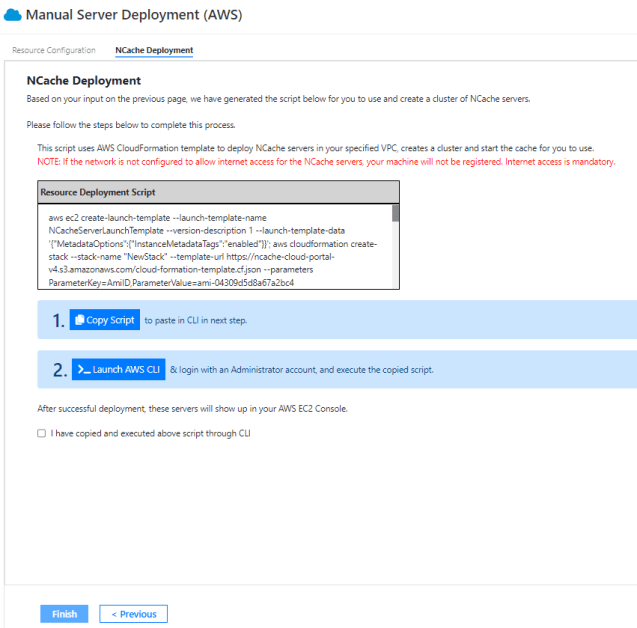
The generated script for resource deployment must be copied and pasted into the AWS CLI (handily accessible on the very same page) after configuration. Following which you must verify that you have done so using the appropriate checkbox.

Figure 5: Resource Deployment Script
This will lead you to the NCache Cloud Portal Dashboard, where you will be able to access your deployed servers and manage them as you see fit. These servers will appear with their status being unknown as opposed their running status in Automatic deployment.
Conclusion
The NCache Enterprise Cloud provides several deployment options on AWS, including manual deployment, which offers better security and control. Users can manually establish parameters for virtual machines, generate key-value pairs for secure access and authentication, and configure their resources in AWS. If you want to test the product and discover the advantages of Manual Deployment in NCache Enterprise Cloud in conjunction with AWS, what are you waiting for? Try the NCache Free Trial today!


