As technology evolves, so do the business approaches associated with it. One of the most prominent examples of this evolution is the noticeable shift towards cloud service deployments. In an effort to support this growth, NCache is offering an NCache Enterprise Cloud free trial in AWS and Azure.
NCache offers two different deployment methods: Automatic and Manual. This blog will discuss the steps involved in Automatic Deployment in Azure. In Automatic Deployment, you can conveniently deploy the required resources through the NCache Cloud Portal without executing any scripts or doing any extra work manually. All this is easily done, as long as you have provided the appropriate permissions to manage your cloud resources.
How to Automatically Deploy NCache in Azure?
To automatically deploy resources for your Azure subscription, you need to provide authorized deployment user information. This user information will allow you to deploy and configure resources in your Azure subscription and continue as follows:
Create Deployment User
You can create the Deployment User in two ways through Automatic Deployment, i.e., via Automatic Deployment User Creation or Manual Deployment User Creation.

Figure 1: Automatic Deployment User Creation in Azure
Automatic Deployment User Creation
For Automatic Deployment User Creation, you need to provide the authorization information of the Azure AD Admin account. This information will grant users with required permissions to create a deployment user and define and assign roles (for specific Azure Subscriptions). After choosing Automatic Deployment User Creation, you will have to log in with your Azure AD Admin account credentials. At which point, you will be redirected back to the Automatic User Creation page where you must enter the necessary information. Following which, you can log in with the Deployment User credentials you have created.
Manual Deployment User Creation
In the case of Manual User Creation, you must fill out a form similar to the one in Automatic User Creation and you will be provided with a script containing your configured parameters, that you will need to execute via an Azure AD admin account.
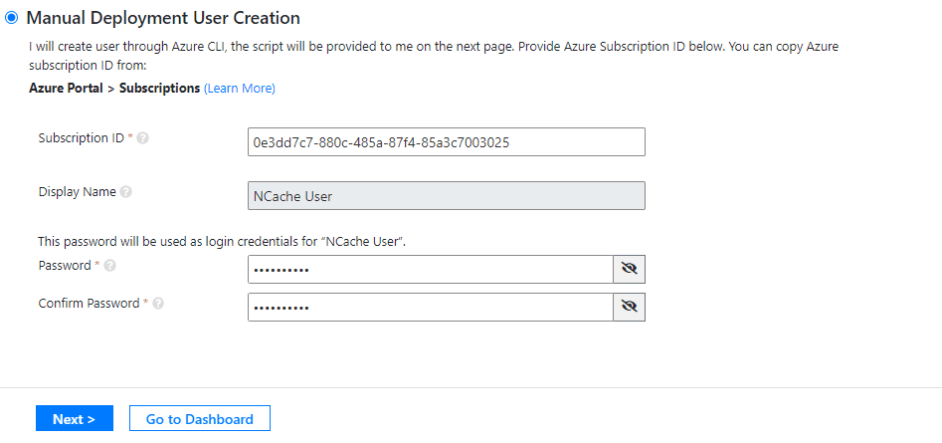
Figure 2: Manual Deployment User Creation Form
Such access is essential to guarantee you have the required permissions for Deployment User Creation, creation of role definition (for specified Azure Subscription), and role assignment.
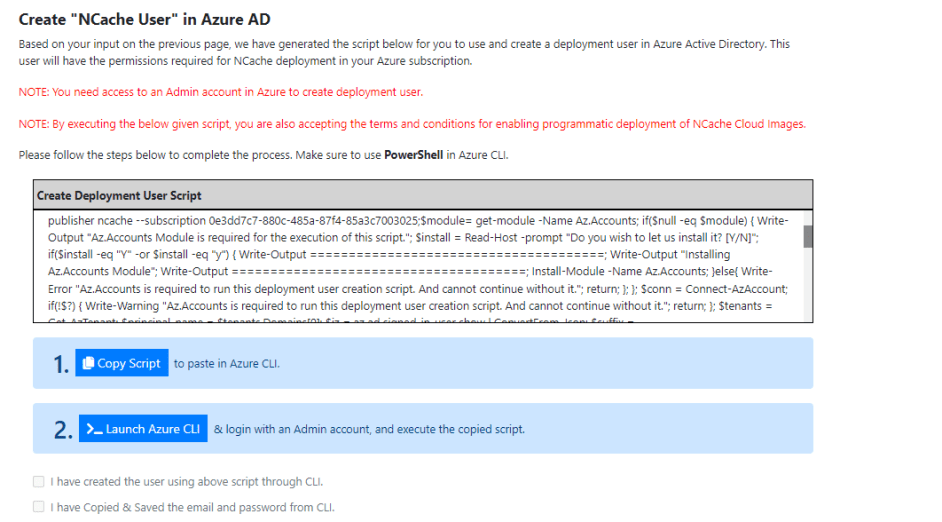
Figure 3: Copying & Executing Script in Manual User Creation
Link Existing Deployment User
Alternatively, you can also Link the Existing Deployment User with your Azure. All you need to do is select your subscription to be Free 60-Day Trial (Azure) and this will pre-populate the Account Name “NCache User”. Just choose the Azure Deployment User and login with a previously created deployment user.
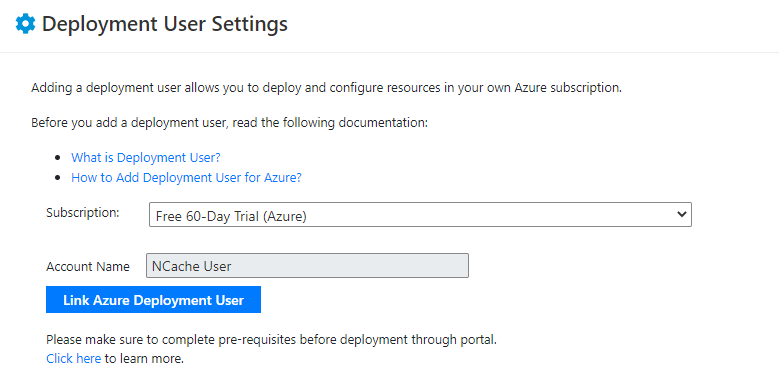
Figure 4: Deployment User Settings
Enable Programmatic Deployment
Enabling Programmatic Deployment will help you seamlessly go through the process of accepting the terms and conditions required to deploy resources for image-based products.
Based on the authorization information you have provided, NCache Cloud Portal will automatically generate a script that you’ll have to execute in the Azure CLI via PowerShell. After enabling the Programmatic Deployment, configure the parameters for the virtual machine, make sure to review it and then move forward.
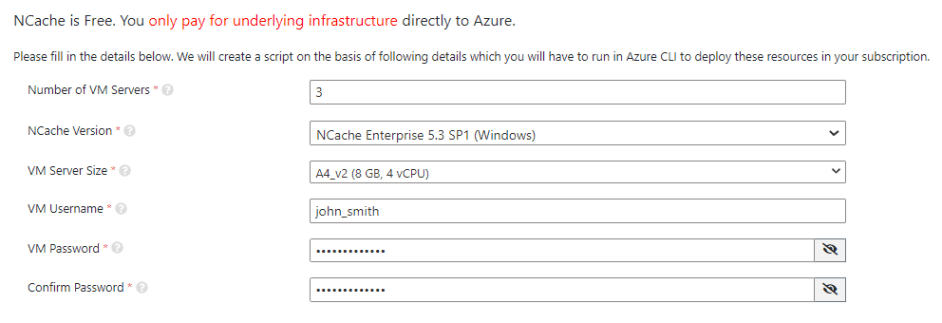
Figure 5: Resource Configuration
While choosing the VM server size check the number of cores and memory size carefully, as it is entirely dependent on these two specifications. Moreover, choose the appropriate number of servers and version (Windows or Linux). It is normally recommended to use three servers per cluster.

Figure 6: Virtual Machines Displayed on the NCache Enterprise Cloud Dashboard
Usage of NCache on Virtual Machines
After successfully deploying and accessing your VM you need to configure NCache to start using the features provided by NCache.
Manage NCache Servers
You can manage your virtual machines through the NCache Cloud Portal by starting, stopping, restarting and removing a VM. You can also perform different server actions like reviewing server information, accessing the NCache Manager and virtual machines through the remote desktop connection when using a Windows-based VM and SSH into the machine when using a Linux-based VM.

Figure 7: NCache Manager Displaying Server Actions
Create Cache Cluster
After registering the machine for NCache evaluation you can create a cache cluster via the NCache Manager or NCache PowerShell cmdlet.
Management Operations on Cache Cluster
Once you have created a cache cluster in your deployed VM, you can also manage it by performing different operations like starting a cache server, stopping a server and adding new server nodes to the cluster when required.
Monitoring Operations on Cache Cluster
Along with the management of cache cluster operations, NCache portal also allows you to monitor these operations by using different performance counters published by NCache. You can monitor these counters using the NCache Monitor Dashboard or the NCache Statistics Dashboard.
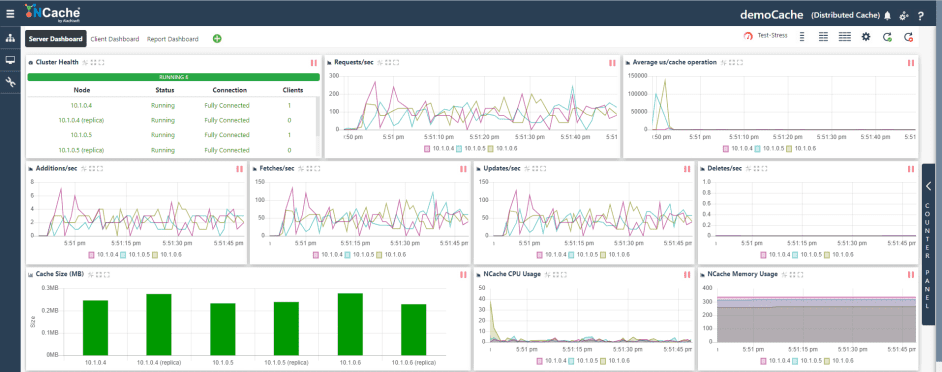
Figure 8: Monitor Cache Cluster through NCache Manager
Conclusion
Automatic Deployment is the most suitable option in scenarios where you don’t want to go through the hassle involved in Manual Deployment. Automatic Deployment not only saves time,but ensures a smooth deployment process. To learn more about NCache Enterprise Cloud in Azure and AWS platforms, please go through the following guides Getting Started with NCache Enterprise Cloud in Azure, and Getting Started with NCache Enterprise Cloud in AWS.


