Create New Clustered Cache
Pre-Requisite
Make sure NCache Service is started. If it is not started, do the following:
In PowerShell, enter the following command:
Start-Service -Name NCacheSvc
For .NET Core, make sure that you run NCache service as an administrator. Here are the steps to do so:
- Open Services window and look for NCache in the list.
- Right click on NCacheSvc from the list and choose Properties.
- Go to the Log On tab and click on the Browse button.
- In the object name field, type Administrator and click on the Check Names button.
- It will pick the appropriate Administrator, then click OK.
- Now, set a Password and click OK.
- Right click on the NCache service and choose the Restart option. Now your service will start running as administrator.
Using NCache Web Manager
Launch NCache Web Manager by browsing to
http://localhost:8251(Windows) or<server-ip>:8251(Windows + Linux).In the left navigation bar, click on Clustered Caches. This opens up the Clustered Caches page at
<server-ip>:8251/ClusteredCaches/. The page shows any existing clustered caches on your machine and additional details like Topology, Servers and Server Platform.To create a new clustered cache, click on New.

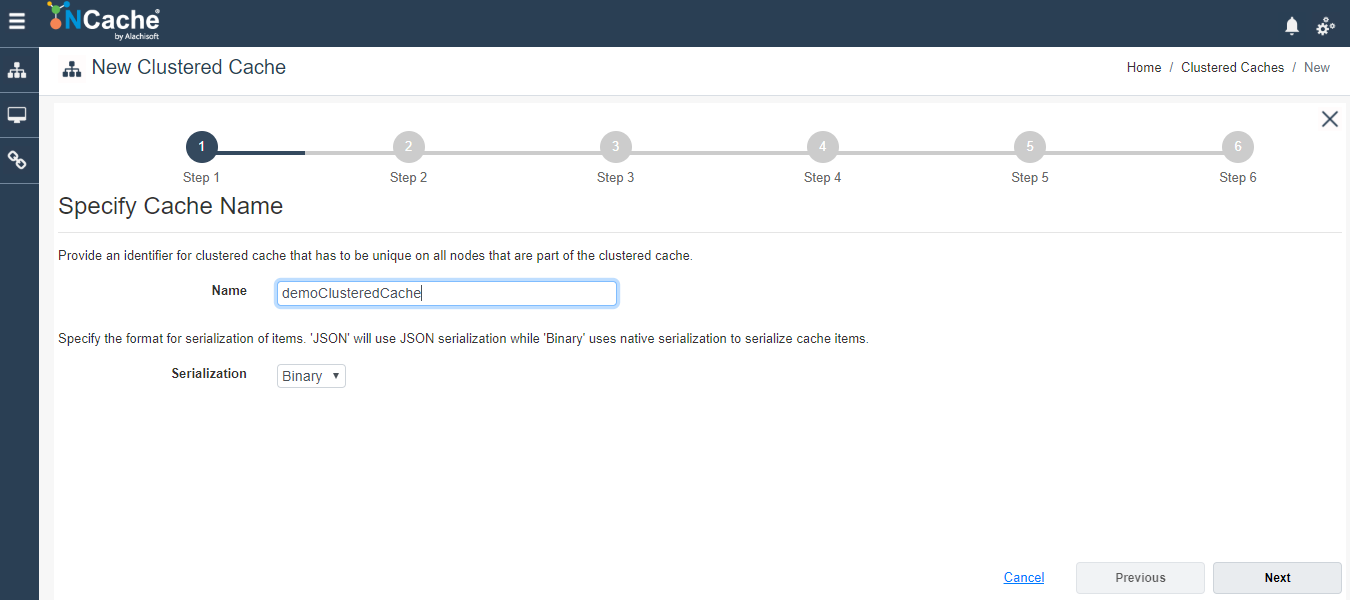
Specify the cache name and serialization (Binary or JSON). Click Next. If a cache by that name exists, you are prompted accordingly.
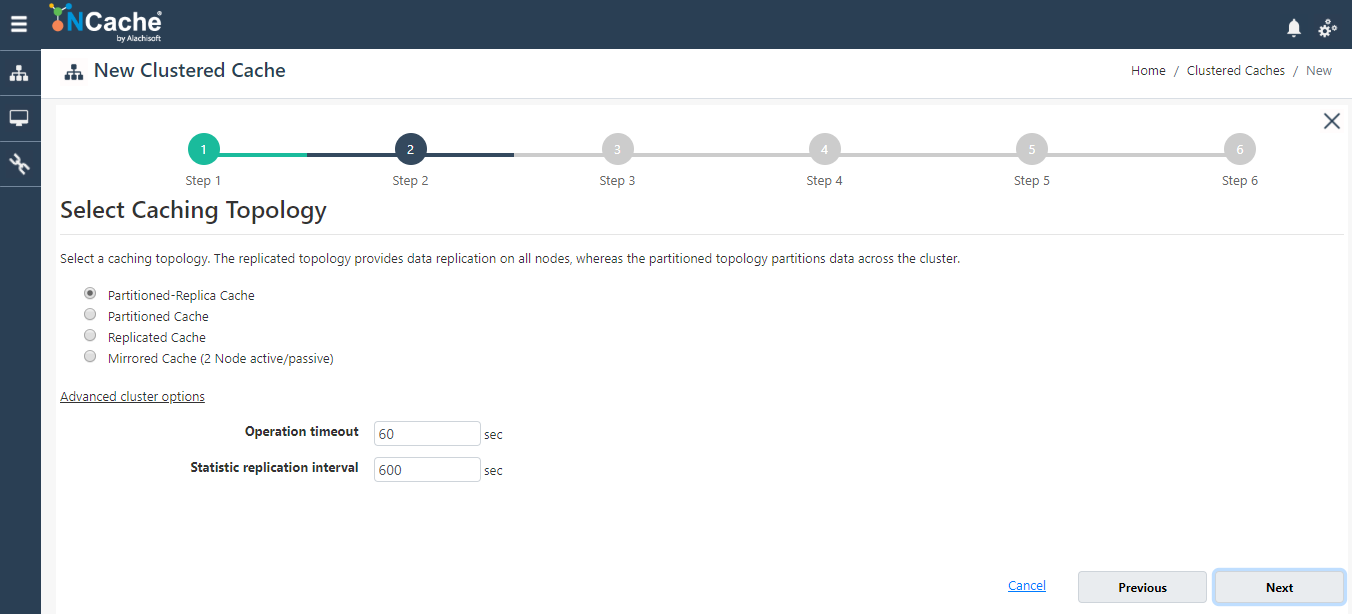
Select the caching topology and any advanced options like Operation Timeout and Statistic Replication Level. Click Next.
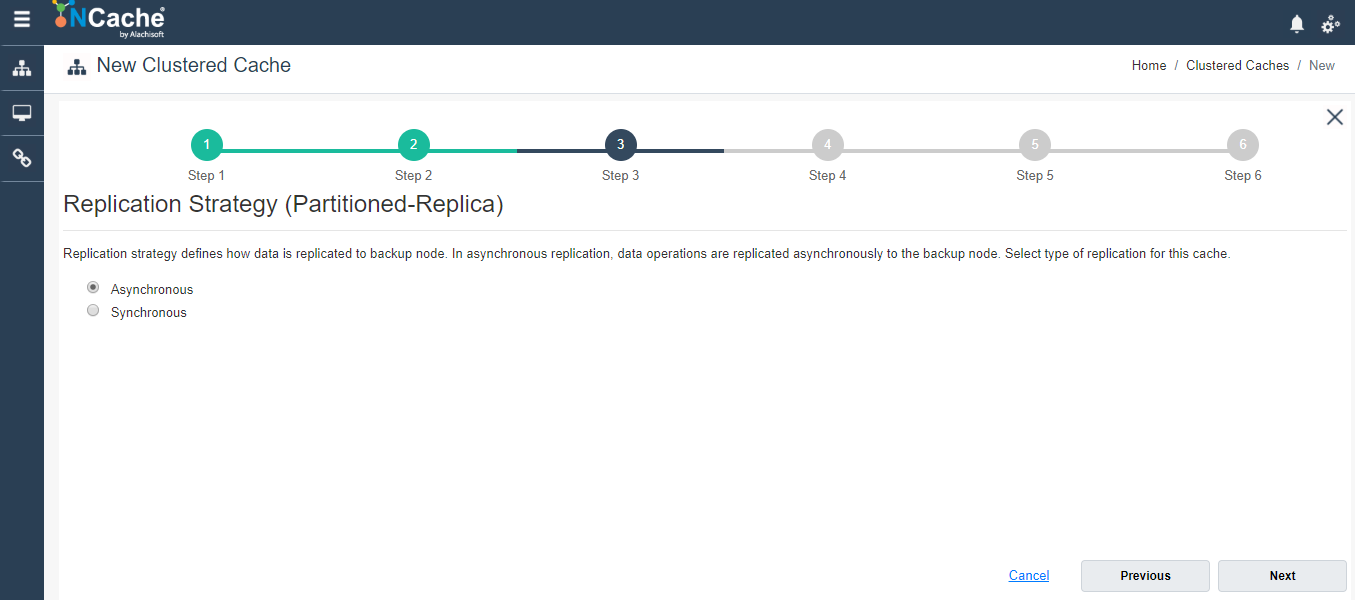
If you selected the Partition-Replica Cache topology, you have to select a Replication Strategy, either Asynchronous or Synchronous. Click Next.
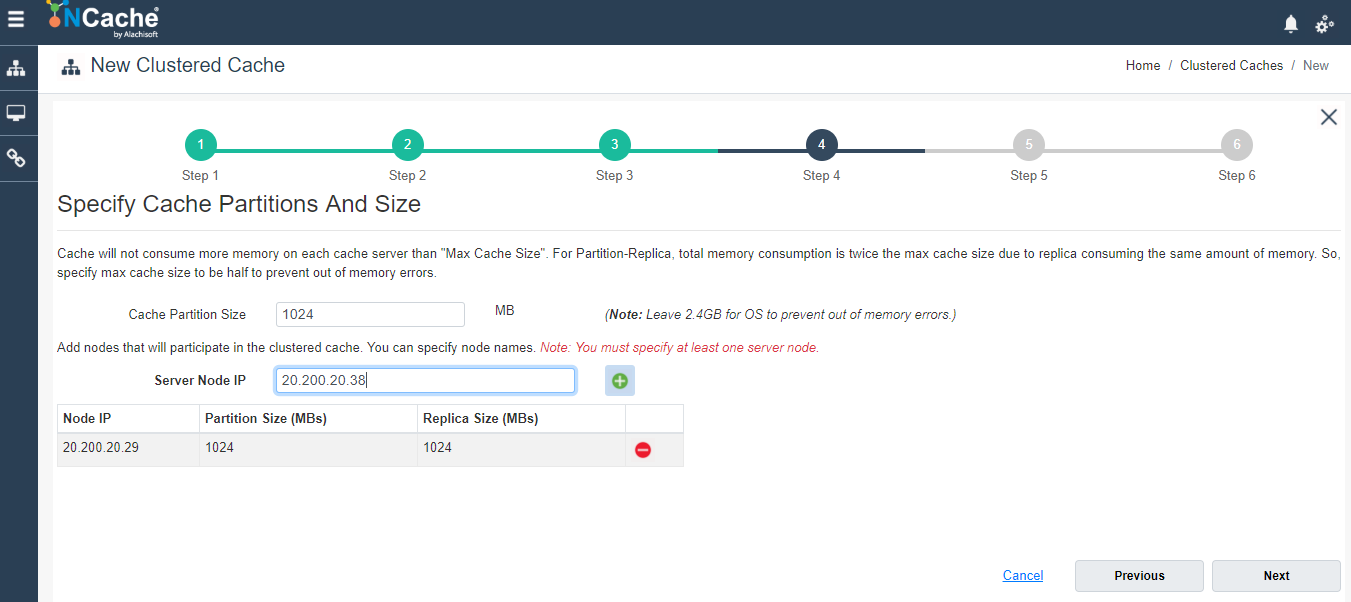
Specify Maximum Size of the cache, if required. You can also add cache nodes to the cluster by specifying the node IP address and clicking on +. To add more nodes, click +. Click Next once all the required nodes are added.
Warning
If a node is already registered on that cache, notification is prompted.
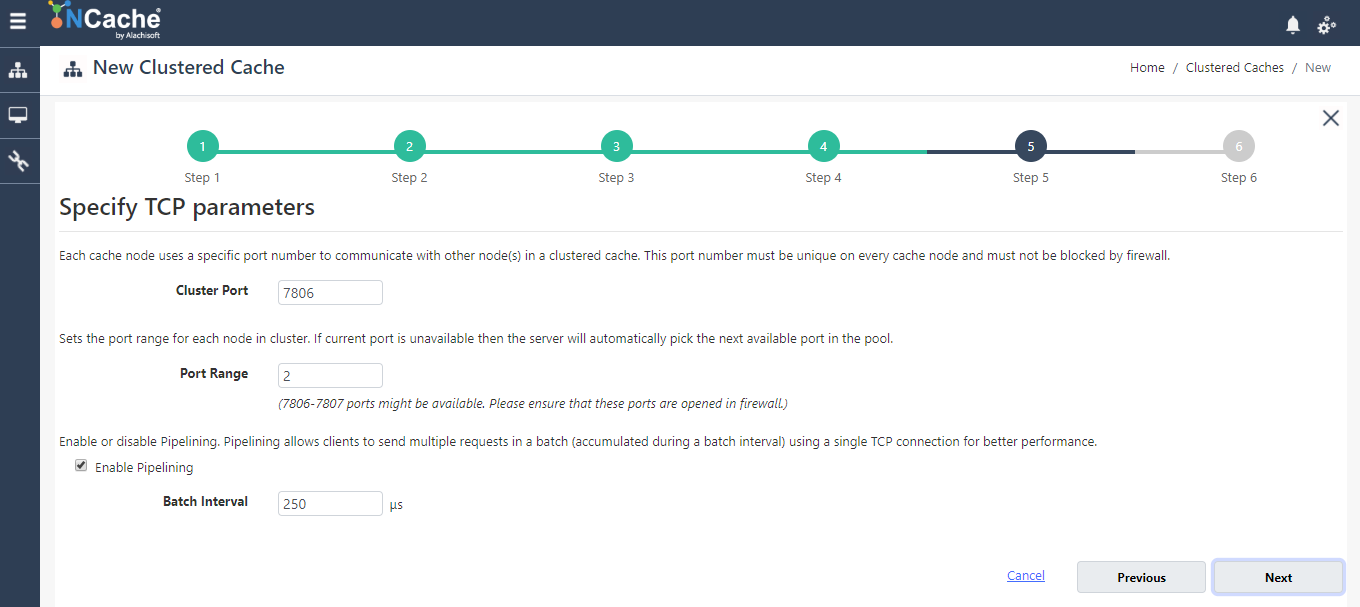
Change the Cluster Port and Port Range if required. Enable pipelining for the cache if required uby checking the Enable Pipelining checkbox. Set the batch interval for the duration after which the commands will be transmitted over the network in microseconds. Click Next.
In Advanced Options page, you can configure the following settings:
Eviction is enabled by default. You can configure the Eviction Policy accordingly. If you want to disable eviction, uncheck the check box Enable Eviction.
You can also change the Eviction percentage; items will be evicted from the cache using this percentage value if eviction is enabled.
You can change the Clean interval value. Default is 15 seconds.
This cache can be started automatically upon the completion of this process if you have checked the Start this cache on Finish checkbox on this dialog box.
You can make the cache to start automatically after service restart by checking the checkbox Auto start this cache on service startup.
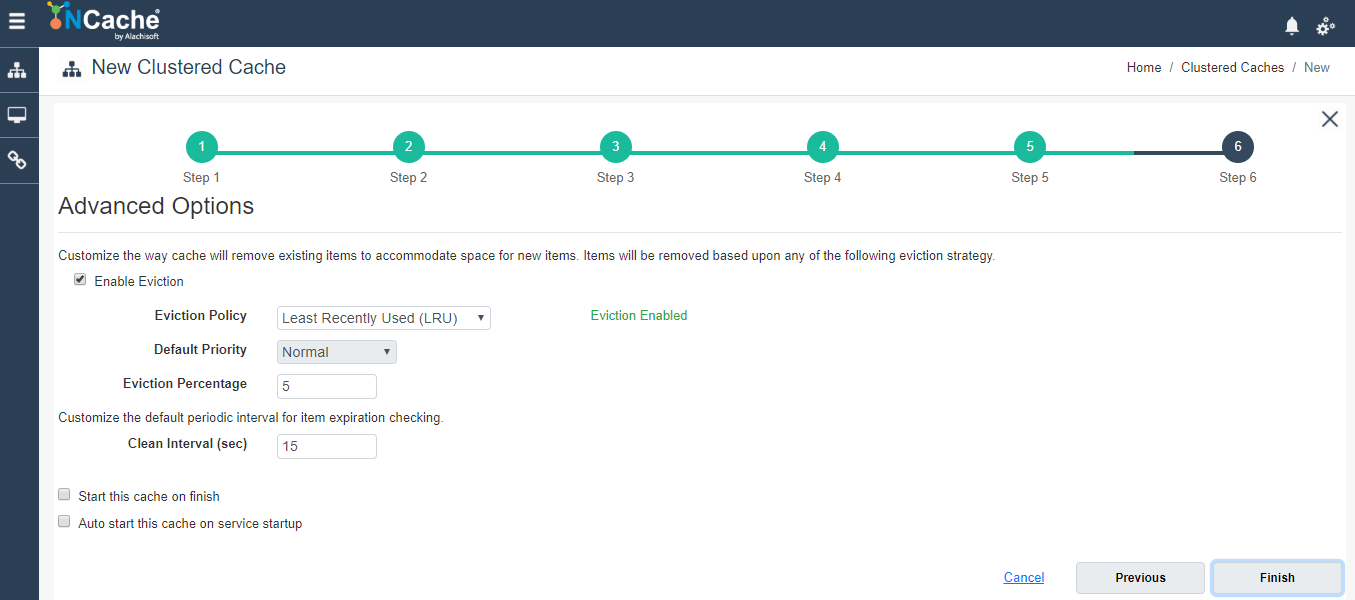
Click Finish. Created cache will appear in Clustered Caches page with the server nodes and their status and a success notification will be received in the notification panel.

Using PowerShell
Create Cache
New-Cache cmdlet enables the user to create a new cache on one or more server nodes.
This Command creates demoClusteredCache of PartitionedOfReplica topology of size 1024MB on node 20.200.20.38.
New-Cache demoClusteredCache -Server 20.200.20.38 -Size 1024 -Topology PartitionedOfReplica
Add Node to Cache
Add-Node cmdlet enables the users to add a new server node to the existing clustered cache on specified server. It also enables users to have multiple server nodes in a clustered cache.
This command adds a new node 20.200.20.29 to the cache named demoCache existing on server node 20.200.20.38 which already exists.
Add-Node -CacheName demoClusteredCache -ExistingServer 20.200.20.38 -NewServer 20.200.20.29
Start Cache
Once the cache is created, you need to start a clustered cache on all the server nodes so that operations can be performed on it. Start-Cache cmdlet enables the user to start the registered cache and Cache process on the nodes.
Perform this step on all server nodes.
Start-Cache -Name demoClusteredCache
Troubleshooting
Sometimes a cluster can not be formed, or cluster nodes are unable to communicate with each other. It may happen when Server and Cluster ports are blocked by firewall. Following error messages can occur in this case:
Error: "No server is available to process the request"
Error: "Unable to communicate with server node"
Workaround
"No server is available to process the request":
Make sure that the Server port (at which NCache Service starts and accepts different client connections) is not blocked by firewall. Default value of this port is '9800'. You can change the default value from cache server configuration file found in NCache as follows:- .NET: Alachsioft.NCache.Service.exe.config located in %NCHOME%/bin/service
- .NET Core Windows: Alachsioft.NCache.Service.dll.config located in %NCHOME%/bin/service
- .NET Core Linux: Alachsioft.NCache.Daemon.dll.config located in /opt/ncache/bin/service
"Unable to communicate with server node":
See if your firewall is allowing the Cluster port. Cluster port is a port at which nodes in a cluster communicate. You can change the default value of these ports from NCache Web Manager. If you have specified a port range in NCache Web Manager, unblock all ports in range.NCache Web Manager unable to connect with NCache Service:
If NCache Web Manager is unable to connect with NCache Service, even when it is started, then your system firewall might be blocking Service port (port number 8250). Unblock Service port from system firewall.
See Also
Create Local Cache
Add Existing Clustered Cache
Remove Cache
Clear Cache